因果卷积和扩展卷积

因果卷积(causal)与扩展卷积(dilated)之An Empirical Evaluation of Generic Convolutional and Recurrent Networks for Sequence Modeling

本文首发于https://www.cnblogs.com/fantastic123/p/9389128.html,这个博客也是我的,所以不是搬运他人的

author:gswycf

  最近在看关于NLP(自然语言处理)方面的文章,(其实不是自己要看),anyway,看了一个“An Empirical Evaluation of Generic Convolutional and Recurrent Networks for Sequence Modeling“,讲到了:虽然人们现在都在用RNN和LSTm去处理序列问题(sequence modeling),但是明显最近几年这些模型在这些问题上出现了瓶颈,你们之前都说CNN不适合处理sequence modeling问题,但其实并不是的,作者提出了一个普适的CNNN模型,在多个序列问题上和之前的RNN和LSTM比较,结果发现,CNN在这方面的能力确实是被低估了,CNN建立的model要比之前人们之前用的RNN要好很多,而且简洁。

  这篇blog并不是要讲那篇文章,我可能会单独写一篇(看有没有时间),这篇blog主要是结束那篇文章中提出的两个概念:因果卷积(causal)与扩展卷积(dilated)


  因果卷积:

  因为要处理序列问题(即要考虑时间问题,)就不能使用普通的CNN卷积,必须使用新的CNN模型,这个就是因果卷积的作用,看下面一个公式,对与序列问题(sequence modeling),主要抽象为,根据x1……xt和y1…..yt-1去预测yt,使得yt接近于实际值

img


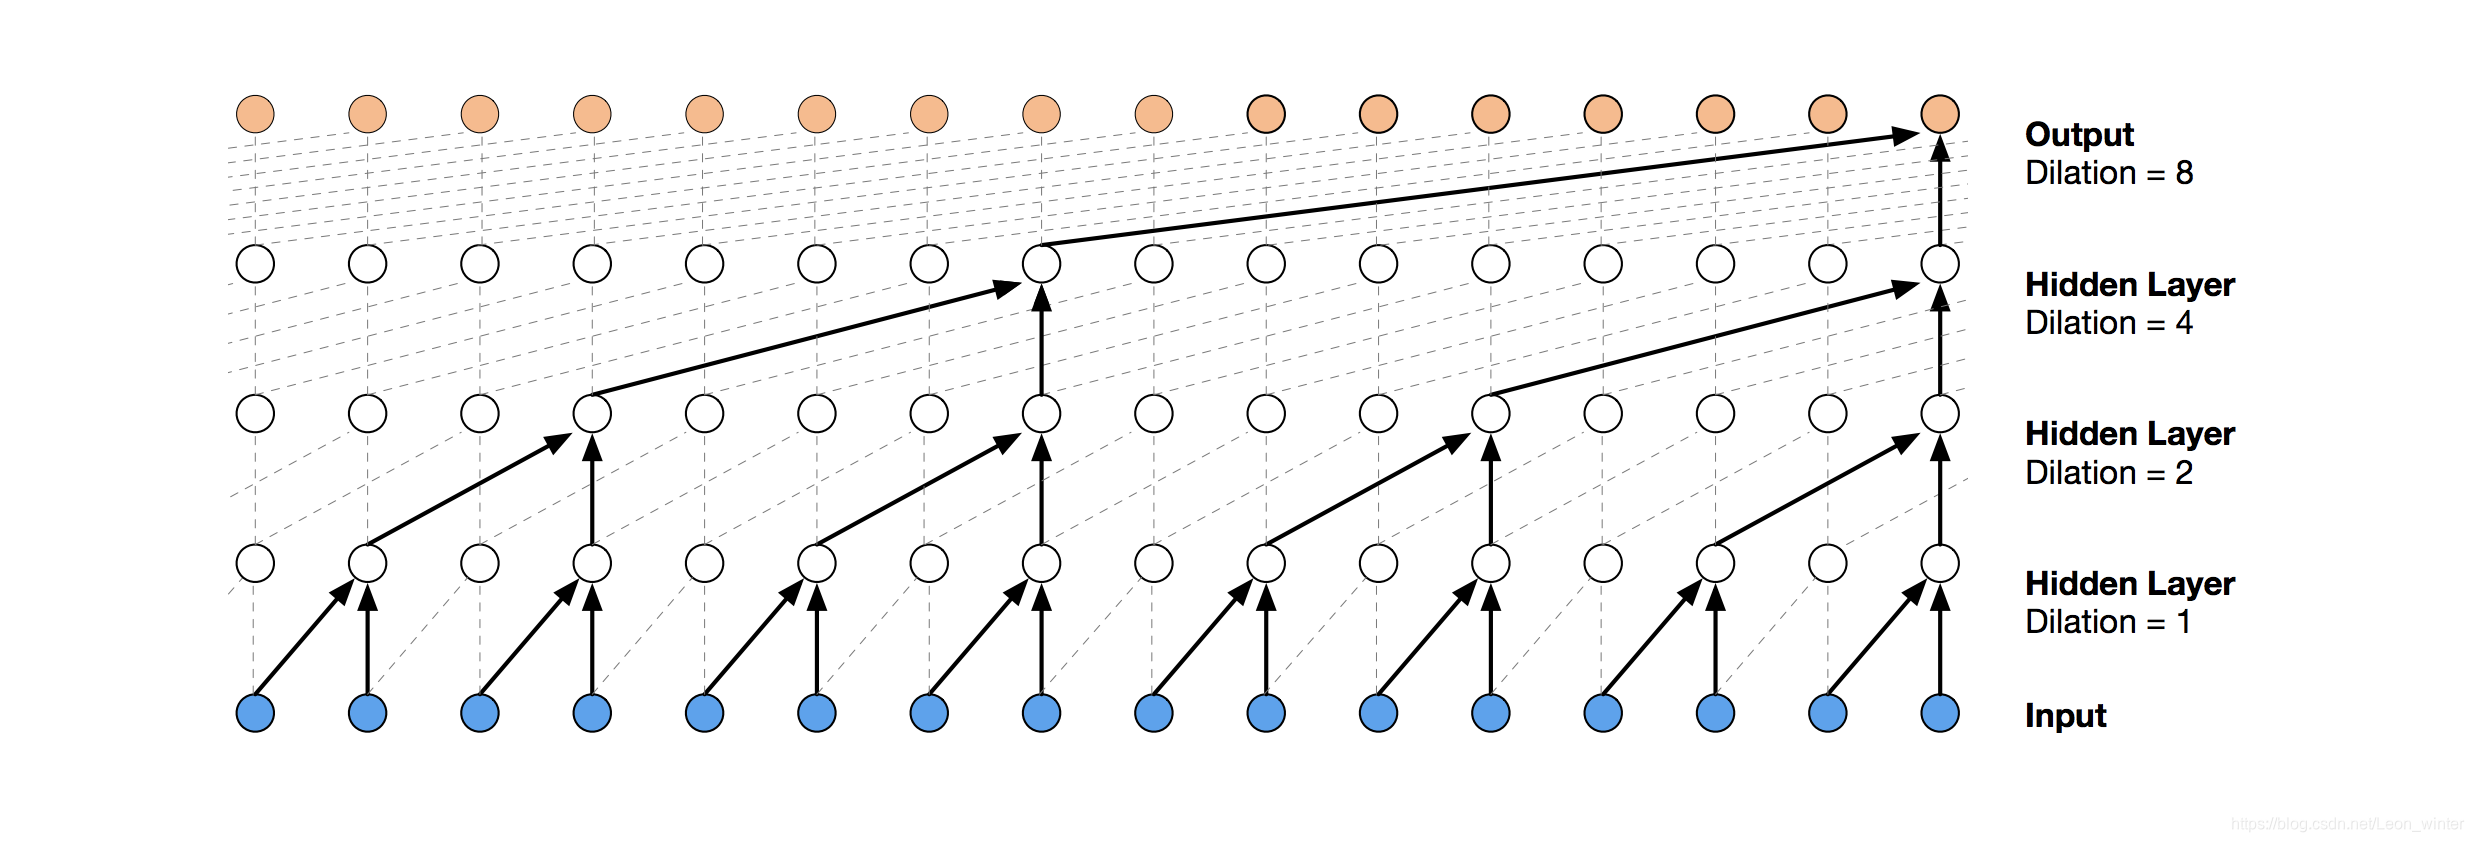
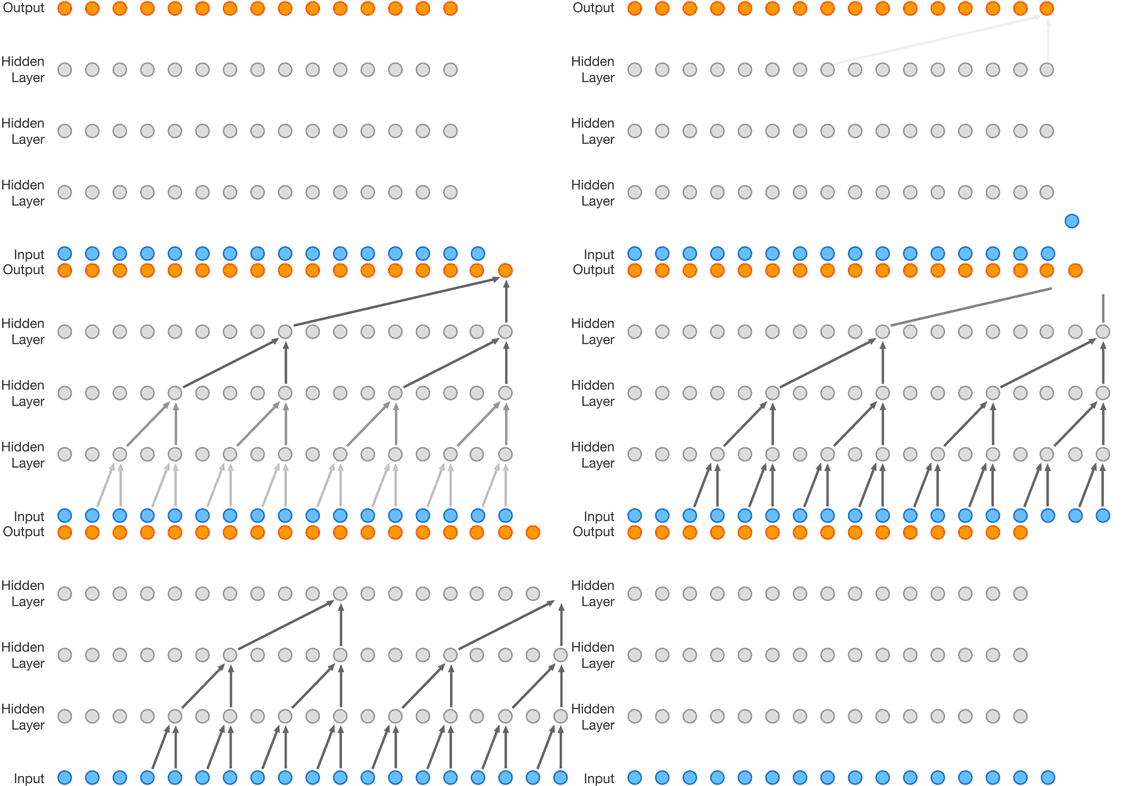
  我们根据图片来看下因果卷积的样子,下面这个图片来自:https://deepmind.com/blog/wavenet-generative-model-raw-audio/

img

  上面的图片可以详细的解释因果卷积,但是问题就来,如果我要考虑很久之前的变量x,那么卷积层数就必须增加(自行体会)。。。卷积层数的增加就带来:梯度消失,训练复杂,拟合效果不好的问题,为了决绝这个问题,出现了扩展卷积(dilated)

  扩展卷积:

  对于因果卷积,存在的一个问题是需要很多层或者很大的filter来增加卷积的感受野。本文中,我们通过大小排列来的扩大卷积来增加感受野。扩大卷积(dilated convolution)是通过跳过部分输入来使filter可以应用于大于filter本身长度的区域。等同于通过增加零来从原始filter中生成更大的filter。

img

这就可以解决因果卷积带来的问题,在示意图中,卷积感受野扩大了1,2,4,8倍。扩大卷积(dilated convolution)可以使模型在层数不大的情况下有非常大的感受野。

CasualCNN

What are causal convolutions?

https://arxiv.org/pdf/1609.03499.pdf

The word causal comes from signal processing, in particular form the characterization of filters. Signals are functions of time and/or space. Filters are functions that remove certain aspects of a signal, leaving only features that you are interested in (e.g. certain frequencies or the positions of certain patterns). Linear filters are filters where, at each point in time and/or space, the output is determined by a weighted sum/integral of the input, i.e. by a convolution. A filter is called causal if the filter output does not depend on future inputs.

In WaveNet the current acoustic intensity that the neural network produces at time step t only depends on data before t. If the network is used to generate new data, then it obviously can’t depend on future data (since it has not been generated yet). During training it could, but then the network could not be used to generate new data. There are two ways of implementing a causal filter in deep learning frameworks: The simplest one is to mask the parts of the filter kernel that are concerned with future input, by setting them to zero at each SGD update, but that is quite expensive as about half of the multiplications and additions go to waste. A more efficient way is to shift and pad the signal by the kernel size and then undo the shifting (which relies on the translation-equivariance property of convolution).

时间卷积网络(TCN):结构+pytorch代码

时间卷积网络(TCN):结构+pytorch代码

TCN

  TCN(Temporal Convolutional Network)是由Shaojie Bai et al.提出的,paper地址:https://arxiv.org/pdf/1803.01271.pdf

  想要了解TCN,最好先知道CNNRNN

  以往一旦提起sequence,或者存在时间序列的数据,想到的神经网络模型就是RNN及其变种LSTM、GRU等。在上面论文提到,很多工作表明,在RNN这个框架中,很难再找到新的模型,其效果可以在很多任务中超越LSTM,但是跳出RNN这个框架,paper作者展示了利用CNN衍生出的TCN结构就很容易在很多任务中取得超过LSTM、GRU的效果。当然paper作者也表示,TCN并不指代一种模型,更像是一种类似RNN的框架,paper作者渴望抛砖引玉,让更多人来探索挖掘这个框架的能力。

TCN结构

  TCN的设计十分巧妙,同ConvLSTM不同的是,ConvLSTM通过引入卷积操作,让LSTM网络可以处理图像信息,其卷积只对一个时间的输入图像进行操作,TCN则直接利用卷积强大的特性,跨时间步提取特征。

  TCN结构很像Wavenet,paper作者也表示确实借鉴了Wavenet的结构,TCN的结构在paper中表示如下,这是一个kernel size=3,dilations=[1,2,4]kernel~size = 3, dilations = [1, 2, 4]kernel size=3,dilations=[1,2,4]的TCN。

img

下图展示了更直接的TCN结构,kernel size=2,dilations=[1,2,4,8]kernel~size = 2, dilations = [1, 2, 4, 8]kernel size=2,dilations=[1,2,4,8]

img

kernel size等于2,即每一层的输入,是上一层的两个时刻的输出;dilations = [1, 2, 4, 8],即每一层的输入的时间间隔有多大,dilation=4,即上一层每前推4个时间步的输出,作为这一层的输入,直到取够kernal size个输入。

  TCN要实现RNN的类似功能,需要解决两个问题,

  1. TCN如何像RNN那样,输入多长的时间步,输出时间步也是同样长度,或者说,每个时间的输入都有对应的输出;
  2. 如何保证历史数据不漏接(no leakage)。

  为了解决上面的两个问题,paper作者分别引入了1-D FCN和因果卷积(Causal Convolutions),可以说
TCN=1D FCN+Causal ConvolutionsTCN = 1DFCN + CausalConvolutionsTCN=1D FCN+Causal Convolutions

1-D FCN的结构

  为了解决第一个问题,TCN利用了1-D FCN的结构,每一个隐层的输入输出的时间长度都相同,维持相同的时间步,具体来看,第一隐层不管kernel size和dilation为多少,输入若是n个时间步,输出也是n个时间步,同样第二隐层,第三隐层。。。的输入输出时间步长度都是n,这点和RNN就很像,不管在哪一层,每个时间步的输入都会有对应的输出。

  对于第一个时间步,没有任何历史的信息,TCN认为其历史数据全是0 (其实就是卷积操作的padding,这一点最好结合下面的代码理解),同时paper作者通过实验发现,TCN保留长远历史信息的能力较LSTM更强。

因果卷积(Causal Convolutions)

  为了解决第二个问题,TCN利用因果卷积(Causal Convolutions),所谓因果,也就是对于输出t时刻的数据yty_{t}yt,其输入只可能是t以及t以前的时刻,即x0…xtx_{0}\dots x_{t}x0…xt,其结构如下:

img

不难发现,这样的卷积连接好像和最上面的TCN结构图不太一样,理论上利用因果卷积是可以搭建TCN,但是如果我们的输出和之前的1000个时间点都存在联系,要获取这种联系,因果卷积构成的TCN深度就是1000-1,如果和历史的10000个时间点有联系,那么深度就是10000-1…,那样TCN就太深了。

膨胀因果卷积(Dilated Causal Convolutions)

  为了有效的应对长历史信息这一问题,paper作者利用了膨胀因果卷积(Dilated Causal Convolutions),还是具有因果性,只不过引入了膨胀因子(dilation factor) ddd,对于kernel size=2,dilations=[1,2,4,8]kernel~size = 2, dilations = [1, 2, 4, 8]kernel size=2,dilations=[1,2,4,8]的TCN,其结构如下:

img

一般膨胀系数是2的指数次方,即1,2,4,8,16,32…

膨胀非因果卷积(Dilated Non-Causal Convolutions)

  LSTM是可以双边输入的,输入不仅利用历史信息,也利用了未来信息,TCN也能做到类似的实现,利用膨胀非因果卷积(Dilated Non-Causal Convolutions),下图展示了kernel size=3,dilations=[1,2,4,8]kernel~size = 3, dilations = [1, 2, 4, 8]kernel size=3,dilations=[1,2,4,8]的膨胀非因果卷积构成的TCN:

img

残差块结构

  同时,就算我们使用了膨胀因果卷积,有时模型可能仍然很深,较深的网络结构可能会引起梯度消失等问题,为了应对这种情况,paper作者利用了一种类似于ResNet中的残差块的结构,这样设计的TCN结构更加的具有泛化能力(generic)。

img

o=Activation(x+F(x))o=Activation(x+F(x))o=Activation(x+F(x))

可以看出来,残差结构替代了TCN层与层之间的简单连接,由于xxx和F(x)F(x)F(x)之间的通道数可能不一样,所以这里设计了一个1×1 Conv1\times1~Conv1×1 Conv来对x做一个简单的变换,使得变换后的xxx与F(x)F(x)F(x)可以相加。其实这里的图都有一定的欺骗性,每一层每个时刻只有一个网格并不代表这一时刻的通道数等于1。

pytorch代码讲解

  paper给的代码是pytorch版本的,获取点这里,其中TCN模型部分的代码如下,重难点部分给出了注释。

1
2
3
4
5
6
7
8
9
10
11
12
13
14
15
16
17
18
19
20
21
22
23
24
25
26
27
28
29
30
31
32
33
34
35
36
37
38
39
40
41
42
43
44
45
46
47
48
49
50
51
52
53
54
55
56
57
58
59
60
61
62
63
64
65
66
67
68
69
70
71
72
73
74
75
76
77
78
79
80
81
82
83
84
85
86
87
88
89
90
91
92
93
94
95
96
97
98
99
100
101
102
103
104
105
106
import torch
import torch.nn as nn
from torch.nn.utils import weight_norm


class Chomp1d(nn.Module):
def __init__(self, chomp_size):
super(Chomp1d, self).__init__()
self.chomp_size = chomp_size

def forward(self, x):
"""
其实这就是一个裁剪的模块,裁剪多出来的padding
"""
return x[:, :, :-self.chomp_size].contiguous()


class TemporalBlock(nn.Module):
def __init__(self, n_inputs, n_outputs, kernel_size, stride, dilation, padding, dropout=0.2):
"""
相当于一个Residual block

:param n_inputs: int, 输入通道数
:param n_outputs: int, 输出通道数
:param kernel_size: int, 卷积核尺寸
:param stride: int, 步长,一般为1
:param dilation: int, 膨胀系数
:param padding: int, 填充系数
:param dropout: float, dropout比率
"""
super(TemporalBlock, self).__init__()
self.conv1 = weight_norm(nn.Conv1d(n_inputs, n_outputs, kernel_size,
stride=stride, padding=padding, dilation=dilation))
# 经过conv1,输出的size其实是(Batch, input_channel, seq_len + padding)
self.chomp1 = Chomp1d(padding) # 裁剪掉多出来的padding部分,维持输出时间步为seq_len
self.relu1 = nn.ReLU()
self.dropout1 = nn.Dropout(dropout)

self.conv2 = weight_norm(nn.Conv1d(n_outputs, n_outputs, kernel_size,
stride=stride, padding=padding, dilation=dilation))
self.chomp2 = Chomp1d(padding) # 裁剪掉多出来的padding部分,维持输出时间步为seq_len
self.relu2 = nn.ReLU()
self.dropout2 = nn.Dropout(dropout)

self.net = nn.Sequential(self.conv1, self.chomp1, self.relu1, self.dropout1,
self.conv2, self.chomp2, self.relu2, self.dropout2)
self.downsample = nn.Conv1d(n_inputs, n_outputs, 1) if n_inputs != n_outputs else None
self.relu = nn.ReLU()
self.init_weights()

def init_weights(self):
"""
参数初始化

:return:
"""
self.conv1.weight.data.normal_(0, 0.01)
self.conv2.weight.data.normal_(0, 0.01)
if self.downsample is not None:
self.downsample.weight.data.normal_(0, 0.01)

def forward(self, x):
"""
:param x: size of (Batch, input_channel, seq_len)
:return:
"""
out = self.net(x)
res = x if self.downsample is None else self.downsample(x)
return self.relu(out + res)


class TemporalConvNet(nn.Module):
def __init__(self, num_inputs, num_channels, kernel_size=2, dropout=0.2):
"""
TCN,目前paper给出的TCN结构很好的支持每个时刻为一个数的情况,即sequence结构,
对于每个时刻为一个向量这种一维结构,勉强可以把向量拆成若干该时刻的输入通道,
对于每个时刻为一个矩阵或更高维图像的情况,就不太好办。

:param num_inputs: int, 输入通道数
:param num_channels: list,每层的hidden_channel数,例如[25,25,25,25]表示有4个隐层,每层hidden_channel数为25
:param kernel_size: int, 卷积核尺寸
:param dropout: float, drop_out比率
"""
super(TemporalConvNet, self).__init__()
layers = []
num_levels = len(num_channels)
for i in range(num_levels):
dilation_size = 2 i # 膨胀系数:1,2,4,8……
in_channels = num_inputs if i == 0 else num_channels[i-1] # 确定每一层的输入通道数
out_channels = num_channels[i] # 确定每一层的输出通道数
layers += [TemporalBlock(in_channels, out_channels, kernel_size, stride=1, dilation=dilation_size,
padding=(kernel_size-1) * dilation_size, dropout=dropout)]

self.network = nn.Sequential(*layers)

def forward(self, x):
"""
输入x的结构不同于RNN,一般RNN的size为(Batch, seq_len, channels)或者(seq_len, Batch, channels),
这里把seq_len放在channels后面,把所有时间步的数据拼起来,当做Conv1d的输入尺寸,实现卷积跨时间步的操作,
很巧妙的设计。

:param x: size of (Batch, input_channel, seq_len)
:return: size of (Batch, output_channel, seq_len)
"""
return self.network(x)
123456789101112131415161718192021222324252627282930313233343536373839404142434445464748495051525354555657585960616263646566676869707172737475767778798081828384858687888990919293949596979899100101102103104105

参考资料:
TCN: https://arxiv.org/pdf/1803.01271.pdf

因果卷积(causal)与扩展卷积(dilated):https://blog.csdn.net/tonygsw/article/details/81280364

philipperemy/keras-tcn
https://github.com/philipperemy/keras-tcn#why-temporal-convolutional-network

【人体姿态】Stacked Hourglass算法详解

【人体姿态】Stacked Hourglass算法详解

Newell, Alejandro, Kaiyu Yang, and Jia Deng. “Stacked hourglass networks for human pose estimation.” arXiv preprint arXiv:1603.06937 (2016).

概述

本文使用全卷积网络解决人体姿态分析问题,截至2016年5月,在MPII姿态分析竞赛中暂列榜首,PCKh(误差小于一半头高的样本比例)达到89.4%。与排名第二的CPM(Convolutiona Pose Machine)1方法相比,思路更明晰,网络更简洁。
作者给出了基于Torch的代码和模型。单显卡,测试时间约130ms,使用cudnn4的训练时间约3天,比CPM方法有显著优势。

本篇博客结合源码,从无到有介绍Stacked Hourglass的搭建思路,之后介绍代价函数与训练过程,最后总结值得学习的思想。

模块化

本篇论文的源码体现了模块->子网络->完整网络的设计思想。

Residual模块

先来复习一下卷积层和pooling层的属性:
核尺寸(kernel)决定了特征的尺度;步长(stride)决定了降采样的比例;算子的通道数(channel)决定了输出数据的层数/深度

本文使用的初级模块称为Residual Module,得名于其中的旁路相加结构(在这篇论文中2称为residual learning)

第一行为卷积路,由三个核尺度不同的卷积层(白色)串联而成,间插有Batch Normalization(浅蓝)和ReLU(浅紫);
第二行为跳级路,只包含一个核尺度为1的卷积层;如果跳级路的输入输出通道数相同,则这一路为单位映射。
所有卷积层的步长为1,pading为1,不改变数据尺寸,只对数据深度(channel)进行变更。
Residual Module由两个参数控制:输入深度M和输出深度N。可以对任意尺寸图像操作。

设计思想:channel大的卷积,kernel要小;kernel大的卷积,channel要小。
其实许多网络已经隐含了模块化的思想,例如AlexNet中重复出现的conv+relu+pool模式。

作用:Residual模块提取了较高层次的特征(卷积路),同时保留了原有层次的信息(跳级路)。不改变数据尺寸,只改变数据深度。可以把它看做一个保尺寸的高级“卷积”层。

Hourglass子网络

Hourglass是本文的核心部件,由Residual模块组成。根据阶数不同,有不同的复杂程度。

一阶Hourglass

上下两个半路都包含若干Residual模块(浅绿),逐步提取更深层次特征。但上半路在原尺度进行,下半路经历了先降采样(红色/2)再升采样(红色*2)的过程。
降采样使用max pooling,升采样使用最近邻插值。

另一种进行升采样的方法是反卷积层(Deconv),可以参看这篇解决分割问题的Fully Convolutional论文。

二阶Hourglass

把一阶模块的灰框内部分替换成一个一阶Hourglass(输入通道256,输出通道N),得到二阶Hourglass:

两个层次的下半路组成了一条两次降采样,再两次升采样的过程。两个层次的下半路则分别在原始尺寸(OriSize)和1/2原始尺寸,辅助升采样。

四阶Hourglass

本文使用的是四阶Hourglass:

每次降采样之前,分出上半路保留原尺度信息;
每次升采样之后,和上一个尺度的数据相加;
两次降采样之间,使用三个Residual模块提取特征;
两次相加之间,使用一个Residual模块提取特征。

由于考虑了各个尺度的特征,本文不需要像CPM3方法一样独立地在图像金字塔上多次运行,速度更快。

作用:n阶Hourglass子网络提取了从原始尺度到1/2n1/2n尺度的特征。不改变数据尺寸,只改变数据深度。

完整网络结构

一级网络

以一个Hourglass(深绿色)为中心,可以从彩色图像预测K个人体部件的响应图:

原始图像经过一次降采样(橙色),输入到Hourglass子网络中。Hourglass的输出结果经过两个线性模块(灰色),得到最终响应图。期间使用Residual模块(浅绿)和卷积层(白色)逐步提取特征。

二级网络

本文使用的完整网络包含两个Hourglass:

对比上图,二级网络重复了一级网络的后半结构。第二个Hourglass的输入包含三路:

  • 第一个Hourglass的输入数据
  • 第一个Hourglass的输出数据
  • 第一级预测结果
    这三路数据通过串接(concat)和相加进行融合,它们的尺度不同,体现了当下流行的跳级结构思想。

代价函数与训练

对于H×W×3H×W×3的输入图像,每一个hourglass级都会生成一个H/2×W/2×KH/2×W/2×K的响应图。对于每个响应图,都比较其与真值的误差作为代价。这种做法和CPM方法类似,都体现了中继监督(intermediate supervision)的思想。

在源码中,整个网络的输出结果包含每个级别的响应图,但在测试中只使用最后一级结果。这是因为torch的代价函数只能绑定在输出数据上。

使用cudnn4,在单个TitanX GPU(12G显存)上训练MPII数据,本文方法需要3天时间。

总结
本论文中值得学习的思想如下:

  • 使用模块进行网络设计
  • 先降采样,再升采样的全卷积结构
  • 跳级结构辅助升采样
  • 中继监督训练

Wei, Shih-En, et al. “Convolutional Pose Machines.” CVPR, 2016 ↩
He, Kaiming, et al. “Deep Residual Learning for Image Recognition.” arXiv preprint arXiv:1512.03385 (2015). ↩
Wei, Shih-En, et al. “Convolutional Pose Machines.” CVPR, 2016 ↩
————————————————
版权声明:本文为CSDN博主「shenxiaolu1984」的原创文章,遵循CC 4.0 BY-SA版权协议,转载请附上原文出处链接及本声明。
原文链接:https://blog.csdn.net/shenxiaolu1984/article/details/51428392

pytorch_resnet

PyTorch框架中有一个非常重要且好用的包:torchvision,该包主要由3个子包组成,分别是:torchvision.datasets、torchvision.models、torchvision.transforms。这3个子包的具体介绍可以参考官网:http://pytorch.org/docs/master/torchvision/index.html。具体代码可以参考github:https://github.com/pytorch/vision/tree/master/torchvision。

这篇博客介绍torchvision.models。torchvision.models这个包中包含alexnet、densenet、inception、resnet、squeezenet、vgg等常用的网络结构,并且提供了预训练模型,可以通过简单调用来读取网络结构和预训练模型。

使用例子:

1
2
import torchvision
model = torchvision.models.resnet50(pretrained=True)

这样就导入了resnet50的预训练模型了。如果只需要网络结构,不需要用预训练模型的参数来初始化,那么就是:

1
model = torchvision.models.resnet50(pretrained=False)

如果要导入densenet模型也是同样的道理,比如导入densenet169,且不需要是预训练的模型:

1
model = torchvision.models.densenet169(pretrained=False)

由于pretrained参数默认是False,所以等价于:

1
model = torchvision.models.densenet169()

不过为了代码清晰,最好还是加上参数赋值。

接下来以导入resnet50为例介绍具体导入模型时候的源码。运行

1
model = torchvision.models.resnet50(pretrained=True)

的时候,是通过models包下的resnet.py脚本进行的,源码如下:

首先是导入必要的库,其中model_zoo是和导入预训练模型相关的包,另外all变量定义了可以从外部import的函数名或类名。这也是前面为什么可以用torchvision.models.resnet50()来调用的原因。model_urls这个字典是预训练模型的下载地址。

1
2
3
4
5
6
7
8
9
10
11
12
13
14
import torch.nn as nn
import math
import torch.utils.model_zoo as model_zoo

__all__ = ['ResNet', 'resnet18', 'resnet34', 'resnet50', 'resnet101',
'resnet152']

model_urls = {
'resnet18': 'https://download.pytorch.org/models/resnet18-5c106cde.pth',
'resnet34': 'https://download.pytorch.org/models/resnet34-333f7ec4.pth',
'resnet50': 'https://download.pytorch.org/models/resnet50-19c8e357.pth',
'resnet101': 'https://download.pytorch.org/models/resnet101-5d3b4d8f.pth',
'resnet152': 'https://download.pytorch.org/models/resnet152-b121ed2d.pth',
}

接下来就是resnet50这个函数了,参数pretrained默认是False。首先model = ResNet(Bottleneck, [3, 4, 6, 3], **kwargs)是构建网络结构,Bottleneck是另外一个构建bottleneck的类,在ResNet网络结构的构建中有很多重复的子结构,这些子结构就是通过Bottleneck类来构建的,后面会介绍。然后如果参数pretrained是True,那么就会通过model_zoo.py中的load_url函数根据model_urls字典下载或导入相应的预训练模型。最后通过调用model的load_state_dict方法用预训练的模型参数来初始化你构建的网络结构,这个方法就是PyTorch中通用的用一个模型的参数初始化另一个模型的层的操作。load_state_dict方法还有一个重要的参数是strict,该参数默认是True,表示预训练模型的层和你的网络结构层严格对应相等(比如层名和维度)。

1
2
3
4
5
6
7
8
9
10
def resnet50(pretrained=False, **kwargs):
"""Constructs a ResNet-50 model.

Args:
pretrained (bool): If True, returns a model pre-trained on ImageNet
"""
model = ResNet(Bottleneck, [3, 4, 6, 3], **kwargs)
if pretrained:
model.load_state_dict(model_zoo.load_url(model_urls['resnet50']))
return model

其他resnet18、resnet101等函数和resnet50基本类似,差别主要是在:1、构建网络结构的时候block的参数不一样,比如resnet18中是[2, 2, 2, 2],resnet101中是[3, 4, 23, 3]。2、调用的block类不一样,比如在resnet50、resnet101、resnet152中调用的是Bottleneck类,而在resnet18和resnet34中调用的是BasicBlock类,这两个类的区别主要是在residual结果中卷积层的数量不同,这个是和网络结构相关的,后面会详细介绍。3、如果下载预训练模型的话,model_urls字典的键不一样,对应不同的预训练模型。因此接下来分别看看如何构建网络结构和如何导入预训练模型。

1
2
3
4
5
6
7
8
9
10
11
12
13
14
15
16
17
18
19
20
21
def resnet18(pretrained=False, **kwargs):
"""Constructs a ResNet-18 model.

Args:
pretrained (bool): If True, returns a model pre-trained on ImageNet
"""
model = ResNet(BasicBlock, [2, 2, 2, 2], **kwargs)
if pretrained:
model.load_state_dict(model_zoo.load_url(model_urls['resnet18']))
return model

def resnet101(pretrained=False, **kwargs):
"""Constructs a ResNet-101 model.

Args:
pretrained (bool): If True, returns a model pre-trained on ImageNet
"""
model = ResNet(Bottleneck, [3, 4, 23, 3], **kwargs)
if pretrained:
model.load_state_dict(model_zoo.load_url(model_urls['resnet101']))
return model

构建ResNet网络是通过ResNet这个类进行的。首先还是继承PyTorch中网络的基类:torch.nn.Module,其次主要的是重写初始化init和forward方法。在初始化init中主要是定义一些层的参数。forward方法中主要是定义数据在层之间的流动顺序,也就是层的连接顺序。另外还可以在类中定义其他私有方法用来模块化一些操作,比如这里的_make_layer方法是用来构建ResNet网络中的4个blocks。_make_layer方法的第一个输入block是Bottleneck或BasicBlock类,第二个输入是该blocks的输出channel,第三个输入是每个blocks中包含多少个residual子结构,因此layers这个列表就是前面resnet50的[3, 4, 6, 3]。
_make_layer方法中比较重要的两行代码是:1、layers.append(block(self.inplanes, planes, stride, downsample)),该部分是将每个blocks的第一个residual结构保存在layers列表中。2、 for i in range(1, blocks): layers.append(block(self.inplanes, planes)),该部分是将每个blocks的剩下residual 结构保存在layers列表中,这样就完成了一个blocks的构造。这两行代码中都是通过Bottleneck这个类来完成每个residual的构建,接下来介绍Bottleneck类。

1
2
3
4
5
6
7
8
9
10
11
12
13
14
15
16
17
18
19
20
21
22
23
24
25
26
27
28
29
30
31
32
33
34
35
36
37
38
39
40
41
42
43
44
45
46
47
48
49
50
51
52
53
54
55
56

class ResNet(nn.Module):
def __init__(self, block, layers, num_classes=1000):
self.inplanes = 64
super(ResNet, self).__init__()
self.conv1 = nn.Conv2d(3, 64, kernel_size=7, stride=2,padding=3,bias=False)
self.bn1 = nn.BatchNorm2d(64)
self.relu = nn.ReLU(inplace=True)
self.maxpool = nn.MaxPool2d(kernel_size=3, stride=2, padding=1)
self.layer1 = self._make_layer(block, 64, layers[0])
self.layer2 = self._make_layer(block, 128, layers[1], stride=2)
self.layer3 = self._make_layer(block, 256, layers[2], stride=2)
self.layer4 = self._make_layer(block, 512, layers[3], stride=2)
self.avgpool = nn.AvgPool2d(7, stride=1)
self.fc = nn.Linear(512 * block.expansion, num_classes)

for m in self.modules():
if isinstance(m, nn.Conv2d):
n = m.kernel_size[0] * m.kernel_size[1] * m.out_channels
m.weight.data.normal_(0, math.sqrt(2. / n))
elif isinstance(m, nn.BatchNorm2d):
m.weight.data.fill_(1)
m.bias.data.zero_()

def _make_layer(self, block, planes, blocks, stride=1):
downsample = None
if stride != 1 or self.inplanes != planes * block.expansion:
downsample = nn.Sequential(
nn.Conv2d(self.inplanes, planes * block.expansion,
kernel_size=1, stride=stride, bias=False),
nn.BatchNorm2d(planes * block.expansion),
)

layers = []
layers.append(block(self.inplanes, planes, stride, downsample))
self.inplanes = planes * block.expansion
for i in range(1, blocks):
layers.append(block(self.inplanes, planes))

return nn.Sequential(*layers)
def forward(self, x):
x = self.conv1(x)
x = self.bn1(x)
x = self.relu(x)
x = self.maxpool(x)

x = self.layer1(x)
x = self.layer2(x)
x = self.layer3(x)
x = self.layer4(x)

x = self.avgpool(x)
x = x.view(x.size(0), -1)
x = self.fc(x)

return x

从前面的ResNet类可以看出,在构造ResNet网络的时候,最重要的是Bottleneck这个类,因为ResNet是由residual结构组成的,而Bottleneck类就是完成residual结构的构建。同样Bottlenect还是继承了torch.nn.Module类,且重写了init和forward方法。从forward方法可以看出,bottleneck就是我们熟悉的3个主要的卷积层、BN层和激活层,最后的out += residual就是element-wise add的操作。

1
2
3
4
5
6
7
8
9
10
11
12
13
14
15
16
17
18
19
20
21
22
23
24
25
26
27
28
29
30
31
32
33
34
35
36
37
38
39
40
41
42
43
44
45
46
47
48
49
50
51
52
53
54
55
56
57
58
59
60
61
62
63
64
65
66
67
68
69
70
71
72
73
74
75
76
class Bottleneck(nn.Module):
expansion = 4

def __init__(self, inplanes, planes, stride=1, downsample=None):
super(Bottleneck, self).__init__()
self.conv1 = nn.Conv2d(inplanes, planes, kernel_size=1, bias=False)
self.bn1 = nn.BatchNorm2d(planes)
self.conv2 = nn.Conv2d(planes, planes, kernel_size=3, stride=stride,
padding=1, bias=False)
self.bn2 = nn.BatchNorm2d(planes)
self.conv3 = nn.Conv2d(planes, planes * 4, kernel_size=1, bias=False)
self.bn3 = nn.BatchNorm2d(planes * 4)
self.relu = nn.ReLU(inplace=True)
self.downsample = downsample
self.stride = stride

def forward(self, x):
residual = x

out = self.conv1(x)
out = self.bn1(out)
out = self.relu(out)

out = self.conv2(out)
out = self.bn2(out)
out = self.relu(out)

out = self.conv3(out)
out = self.bn3(out)

if self.downsample is not None:
residual = self.downsample(x)

out += residual
out = self.relu(out)

return out

BasicBlock类和Bottleneck类类似,前者主要是用来构建ResNet18和ResNet34网络,因为这两个网络的residual结构只包含两个卷积层,没有Bottleneck类中的bottleneck概念。因此在该类中,第一个卷积层采用的是kernel_size=3的卷积,如conv3x3函数所示。

​```python
def conv3x3(in_planes, out_planes, stride=1):
"""3x3 convolution with padding"""
return nn.Conv2d(in_planes, out_planes, kernel_size=3, stride=stride,
padding=1, bias=False)

class BasicBlock(nn.Module):
expansion = 1

def __init__(self, inplanes, planes, stride=1, downsample=None):
super(BasicBlock, self).__init__()
self.conv1 = conv3x3(inplanes, planes, stride)
self.bn1 = nn.BatchNorm2d(planes)
self.relu = nn.ReLU(inplace=True)
self.conv2 = conv3x3(planes, planes)
self.bn2 = nn.BatchNorm2d(planes)
self.downsample = downsample
self.stride = stride

def forward(self, x):
residual = x

out = self.conv1(x)
out = self.bn1(out)
out = self.relu(out)

out = self.conv2(out)
out = self.bn2(out)

if self.downsample is not None:
residual = self.downsample(x)

out += residual
out = self.relu(out)

return out

介绍完如何构建网络,接下来就是如何获取预训练模型。前面提到这一行代码:if pretrained: model.load_state_dict(model_zoo.load_url(model_urls[‘resnet50’])),主要就是通过model_zoo.py中的load_url函数根据model_urls字典导入相应的预训练模型,models_zoo.py脚本的github地址:https://github.com/pytorch/pytorch/blob/master/torch/utils/model_zoo.py。
load_url函数源码如下。首先model_dir是下载下来的模型的保存地址,如果没有指定的话就会保存在项目的.torch目录下,最好指定。cached_file是保存模型的路径加上模型名称。接下来的 if not os.path.exists(cached_file)语句用来判断是否指定目录下已经存在要下载模型,如果已经存在,就直接调用torch.load接口导入模型,如果不存在,则从网上下载,下载是通过_download_url_to_file(url, cached_file, hash_prefix, progress=progress)进行的,不再细讲。重点在于模型导入是通过torch.load()接口来进行的,不管你的模型是从网上下载的还是本地已有的。

1
2
3
4
5
6
7
8
9
10
11
12
13
14
15
16
17
18
19
20
21
22
23
24
25
26
27
28
29
30
31
32
33
34
35
36
def load_url(url, model_dir=None, map_location=None, progress=True):
r"""Loads the Torch serialized object at the given URL.

If the object is already present in `model_dir`, it's deserialized and
returned. The filename part of the URL should follow the naming convention
``filename-<sha256>.ext`` where ``<sha256>`` is the first eight or more
digits of the SHA256 hash of the contents of the file. The hash is used to
ensure unique names and to verify the contents of the file.

The default value of `model_dir` is ``$TORCH_HOME/models`` where
``$TORCH_HOME`` defaults to ``~/.torch``. The default directory can be
overriden with the ``$TORCH_MODEL_ZOO`` environment variable.

Args:
url (string): URL of the object to download
model_dir (string, optional): directory in which to save the object
map_location (optional): a function or a dict specifying how to remap storage locations (see torch.load)
progress (bool, optional): whether or not to display a progress bar to stderr

Example:
>>> state_dict = torch.utils.model_zoo.load_url('https://s3.amazonaws.com/pytorch/models/resnet18-5c106cde.pth')

"""
if model_dir is None:
torch_home = os.path.expanduser(os.getenv('TORCH_HOME', '~/.torch'))
model_dir = os.getenv('TORCH_MODEL_ZOO', os.path.join(torch_home, 'models'))
if not os.path.exists(model_dir):
os.makedirs(model_dir)
parts = urlparse(url)
filename = os.path.basename(parts.path)
cached_file = os.path.join(model_dir, filename)
if not os.path.exists(cached_file):
sys.stderr.write('Downloading: "{}" to {}\n'.format(url, cached_file))
hash_prefix = HASH_REGEX.search(filename).group(1)
_download_url_to_file(url, cached_file, hash_prefix, progress=progress)
return torch.load(cached_file, map_location=map_location)

————————————————
版权声明:本文为CSDN博主「AI之路」的原创文章,遵循CC 4.0 BY-SA版权协议,转载请附上原文出处链接及本声明。
原文链接:https://blog.csdn.net/u014380165/java/article/details/79119664

VAE

VAEs简介

变分自编码器(Variational auto-encoder,VAE)是一类重要的生成模型(generative
model),它于2013年由Diederik P.Kingma和Max Welling提出[1]。2016年Carl
Doersch写了一篇VAEs的tutorial[2],对VAEs做了更详细的介绍,比文献[1]更易懂。这篇读书笔记基于文献[1]。

除了VAEs,还有一类重要的生成模型GANs(对GANs感兴趣可以去我的微信公众号看介绍文章:学术兴趣小组)。

我们来看一下VAE是怎样设计的。

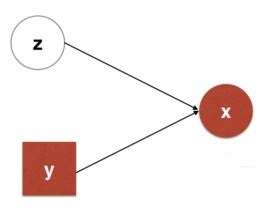
上图是VAE的图模型。我们能观测到的数据是 $\displaystyle \text{x}$ ,而 $\displaystyle \text{x}$
由隐变量 $\displaystyle \text{z}$ 产生,由 $\displaystyle \text{z}\rightarrow
\text{x}$ 是生成模型 $\displaystyle p_{\theta}(\text{x}|\text{z})$ ,从自编码器(auto-
encoder)的角度来看,就是解码器;而由 $\displaystyle \text{x}\rightarrow \text{z}$
是识别模型(recognition model) $\displaystyle q_{\phi}(\text{z}|\text{x})$
,类似于自编码器的编码器。

VAEs现在广泛地用于生成图像,当生成模型 $\displaystyle p_{\theta}(\text{x}|\text{z})$
训练好了以后,我们就可以用它来生成图像了。与GANs不同的是,我们是知道图像的密度函数(PDF)的(或者说,是我们设定的),而GANs我们并不知道图像的分布。

VAEs模型的理论推导

以下的推导参考了文献[1]和[3],文献[3]是变分推理的课件。

首先,假定所有的数据都是独立同分布的(i.i.d),两个观测不会相互影响。我们要对生成模型 $\displaystyle
p_{\theta}(\text{x}|\text{z})$ 做参数估计,利用对数最大似然法,就是要最大化下面的对数似然函数:

$\displaystyle \log
p_{\theta}(\text{x}^{(1)},\text{x}^{(2)},\cdots,\text{x}^{(N)})=\sum_{i=1}^N
\log p_{\theta}(\text{x}^{(i)})$

VAEs用识别模型 $\displaystyle q_{\phi}(\text{z}|\text{x}^{(i)})$ 去逼近真实的后验概率
$\displaystyle p_{\theta}(\text{z}|\text{x}^{(i)})$ ,衡量两个分布的相似程度,我们一般采用KL散度,即

$\displaystyle \begin{align}
KL(q_{\phi}(\text{z}|\text{x}^{(i)})||p_{\theta}(\text{z}|\text{x}^{(i)}))&=\mathbb{E}{q{\phi}(\text{z}|\text{x}^{(i)})}
\log
\frac{q_{\phi}(\text{z}|\text{x}^{(i)})}{p_{\theta}(\text{z}|\text{x}^{(i)})}\
&=\mathbb{E}{q{\phi}(\text{z}|\text{x}^{(i)})} \log
\frac{q_{\phi}(\text{z}|\text{x}^{(i)})p_{\theta}(\text{x}^{(i)})}{p_{\theta}(\text{z}|\text{x}^{(i)})p_{\theta}(\text{x}^{(i)})}\
&=\mathbb{E}{q{\phi}(\text{z}|\text{x}^{(i)})} \log
\frac{q_{\phi}(\text{z}|\text{x}^{(i)})}{p_{\theta}(\text{z},\text{x}^{(i)})}+\mathbb{E}{q{\phi}(\text{z}|\text{x}^{(i)})}
\log p_{\theta}(\text{x}^{(i)})\
&=\mathbb{E}{q{\phi}(\text{z}|\text{x}^{(i)})} \log
\frac{q_{\phi}(\text{z}|\text{x}^{(i)})}{p_{\theta}(\text{z},\text{x}^{(i)})}+\log
p_{\theta}(\text{x}^{(i)}) \end{align}$

于是

$\displaystyle \log
p_{\theta}(\text{x}^{(i)})=KL(q_{\phi}(\text{z}|\text{x}^{(i)}),
p_{\theta}(\text{z}|\text{x}^{(i)}))+\mathcal{L}(\theta,\phi;\text{x}^{(i)})$

其中,

$\displaystyle \begin{align} \mathcal{L}(\theta,\phi;\text{x}^{(i)})& =
-\mathbb{E}{q{\phi}(\text{z}|\text{x}^{(i)})} \log
\frac{q_{\phi}(\text{z}|\text{x}^{(i)})}{p_{\theta}(\text{z},\text{x}^{(i)})}\
&=\mathbb{E}{q{\phi}(\text{z}|\text{x}^{(i)})} \log p_{\theta}(\text{z},
\text{x}^{(i)}) - \mathbb{E}{q{\phi}(\text{z}|\text{x}^{(i)})} \log
q_{\phi}(\text{z}|\text{x}^{(i)}) \end{align}$

由于KL散度非负,当两个分布一致时(允许在一个零测集上不一致),KL散度为0。于是 $\displaystyle \log
p_{\theta}(\text{x}^{(i)}) \geq \mathcal{L}(\theta,\phi;\text{x}^{(i)})$ 。
$\displaystyle \mathcal{L}(\theta,\phi;\text{x}^{(i)})$ 称为对数似然函数的变分下界。

直接优化 $\displaystyle \log p_{\theta}(\text{x}^{(i)})$ 是不可行的,因此一般转而优化它的下界
$\displaystyle \mathcal{L}(\theta,\phi;\text{x}^{(i)})$ 。对应的,优化对数似然函数转化为优化
$\displaystyle \mathcal{L}(\theta,\phi;\text{X})=\sum_{i=1}^N
\mathcal{L}(\theta,\phi;\text{x}^{(i)})$ 。

作者指出, $\displaystyle \mathcal{L}(\theta,\phi;\text{x}^{(i)})$ 对
$\displaystyle \phi$ 的梯度方差很大,不适于用于数值计算。为了解决这个问题,假定识别模型 $\displaystyle
q_{\phi}(\text{z}|\text{x})$ 可以写成可微函数 $\displaystyle g_{\phi}(\epsilon,
\text{x})$ ,其中, $\displaystyle \epsilon$ 为噪声, $\displaystyle \epsilon \sim
p(\epsilon)$ 。于是, $\displaystyle \mathcal{L}(\theta,\phi;\text{x}^{(i)})$
可以做如下估计(利用蒙特卡罗方法估计期望):

$\displaystyle
\mathcal{\tilde{L}}^A(\theta,\phi;\text{x}^{(i)})=\frac{1}{L}\sum_{l=1}^L
[\log p_{\theta}(\text{x}^{(i)}, \text{z}^{(i,l)}) - \log
q_{\phi}(\text{z}^{(i,l)}|\text{x}^{(i)})]$

其中, $\displaystyle \text{z}^{(i,l)}=g_{\phi}(\epsilon^{(i,l)},
\text{x}^{(i)}), \quad \epsilon^{(i,l)} \sim p(\epsilon)$ 。

此外, $\displaystyle \mathcal{L}(\theta,\phi;\text{x}^{(i)})$ 还可以改写为

$\displaystyle
\mathcal{L}(\theta,\phi;\text{x}^{(i)})=-KL(q_{\phi}(\text{z}|\text{x}^{(i)})||p_{\theta}(\text{z}))

  • \mathbb{E}{q{\phi}(\text{z}|\text{x}^{(i)})} \log
    p_{\theta}(\text{x}^{(i)}|\text{z})$

由此可以得到另外一个估计

$\displaystyle \mathcal{\tilde{L}}^B(\theta, \phi;
\text{x}^{(i)})=-KL(q_{\phi}(\text{z}|\text{x}^{(i)})||p_{\theta}(\text{z}))
+\frac{1}{L} \sum_{l=1}^L \log p_{\theta}(\text{x}^{(i)}|\text{z}^{(i,l)})$

其中, $\displaystyle \text{z}^{(i,l)}=g_{\phi}(\epsilon^{(i,l)},
\text{x}^{(i)}), \quad \epsilon^{(i,l)} \sim p(\epsilon)$ 。

实际试验时,如果样本量 $\displaystyle N$
很大,我们一般采用minibatch的方法进行学习,对数似然函数的下界可以通过minibatch来估计:

$\displaystyle \mathcal{L}(\theta,\phi;\text{X})\simeq \mathcal{\tilde{L}}^M
(\theta,\phi;\text{X}^M)=\frac{N}{M}\sum_{i=1}^M
\mathcal{\tilde{L}}(\theta,\phi;\text{x}^{(i)})$

可以看到,为了计算 $\displaystyle \mathcal{L}(\theta,\phi;\text{X})$ ,我们用了两层估计。当
$\displaystyle M$ 较大时,内层估计可以由外层估计来完成,也就是说,取 $\displaystyle L=1$
即可。实际计算中,作者取 $\displaystyle M=100,L=1$ 。由上述推导得到AEVB算法:

VAEs模型

上面给的AEVB算法是一个算法框架,只有给定了 $\displaystyle \epsilon,
p_{\theta}(\text{x}|\text{z}), q_{\phi}(\text{z}|\text{x}),
p_{\theta}(\text{z})$ 分布的形式以及 $\displaystyle g_{\phi}(\epsilon, \text{x})$
,我们才能启动算法。实际应用中,作者取

$\displaystyle \begin{align} p(\epsilon) &= \mathcal{N}(\epsilon;
0,\text{I})\\ q_{\phi}(\text{z}|\text{x}^{(i)}) &= \mathcal{N}(\text{z};
{\mu}^{(i)}, {\sigma}^{2(i)}\text{I})\
p_{\theta}(\text{z})&=\mathcal{N}(\text{z}; 0,\text{I})\
g_{\phi}(\epsilon^{(l)}, \text{x}^{(i)}) &= {\mu}^{(i)}+{\sigma}^{(i)}\odot
\epsilon^{(l)} \end{align}$

而 $\displaystyle p_{\theta}(\text{x}|\text{z})$
根据样本是实值还是二元数据进行选择,若样本为二元数据,则选择

$\displaystyle p_{\theta}(x_i|\text{z})=\mathcal{B}(x_i;1,y_i)=y_i^{x_i}\cdot
(1-y_i)^{1-x_i}, \quad i=1,2,\cdots,D_{\text x}(D_{\text x}=\dim(\text{x}))$

若样本是实值数据,则选择

$\displaystyle p_{\theta}(\text{x}^{(i)}|\text{z})=\mathcal{N}(\text{x}^{(i)};
\mu’^{(i)},\sigma’^{2(i)}\text{I})$

实验中,作者选择多层感知器(MLP)对 $\displaystyle p_{\theta}(\text{x}|\text{z}),
q_{\phi}(\text{z}|\text{x})$ 进行拟合,具体来说,

对 $\displaystyle p_{\theta}(\text{x}|\text{z})$ ,参数为 $\displaystyle
\theta=(\mu’, \sigma’)$ ,若样本为二元数据,则

$\displaystyle \begin{align} \log p(\text{x}|\text{z}) &= \sum_{i=1}^{D_\text
x} x_i \log y_i + (1-x_i)\cdot \log (1-y_i)\\ \text{y}&=\text{sigmoid}(\text
W_2 \tanh(\text W_1\text{z} + \text b_1) + \text b_2) \end{align}$

若样本为实值数据,则

$\displaystyle \begin{align} \mu’ &= \text{W}_4\text{h}’+\text{b}_4 \
\sigma’ &= \text W_5\text{h}’ + \text{b}_5\\ \text{h}’ &= \tanh(\text W_3
\text{z} + \text b_3) \end{align}$

对 $\displaystyle q_{\phi}(\text{z}|\text{x})$ ,参数为 $\displaystyle
\phi=(\mu, \sigma)$ ,

$\displaystyle \begin{align} \mu &= \text{W}_7\text{h}+\text{b}_7 \\ \sigma
&= \text W_8\text{h} + \text{b}_8\\ \text{h} &= \tanh(\text W_6 \text{x} +
\text b_6) \end{align}$

根据以上假设的分布,不难计算

$\displaystyle \mathcal{L}(\theta,\phi;\text{x}^{(i)}) \simeq
\frac{1}{2}\sum_{j=1}^{D_\text z}(1 + \log ((\sigma_j^{(i)})^2) -
(\mu_j^{(i)})^2 - (\sigma_j^{(i)})^2) + \frac{1}{L}\sum_{l=1}^L \log
p_{\theta}(\text{x}^{(i)} | \text{z}^{(i,l)})$

其中, $\displaystyle \text{z}^{(i,l)}=\mu^{(i)}+\sigma^{(i)}
\odot\epsilon^{(l)}, \quad \epsilon^{(l)} \sim p(\epsilon)$ 。

###loss的推导:
$D_{K L}\left(q_{\phi}(z \mid x)|| p_{\theta}(z)\right), p_{\theta}(z) \sim \mathrm{N}(0,1),$ 下面推导过程将 $\left(q_{\phi}(z \mid x) \text { 简化为 } q\right.$
$D_{K L}\left(q_{\phi}(z \mid x)|| p_{\theta}(z)\right)=\int q(z) \log \frac{q(z)}{p(z)} d z$
$=\int q(z)((\log q(z)-\log p(z)) d z$
$=\int q(z)\left(\log \left(\frac{1}{\sqrt{2 \pi \sigma^{2}}} e^{\frac{(z-\mu)^{2}}{2 \sigma^{2}}}\right)-\log \left(\frac{1}{\sqrt{2 \pi}} e^{\frac{(z)^{2}}{2}}\right)\right.$
$=\int q(z)\left(\log \frac{1}{\sigma}\right) d z+\int \frac{z^{2}}{2} q(z) d z-\int \frac{(z-\mu)^{2}}{2 \sigma^{2}} q(z)$
观察第一项就是常数和概率密度积分求和 观察最后一项,其实就是求方差,因此可以很快得到答案 $\frac{1}{2}$
$=\left(\log \frac{1}{\sigma}\right)+\int \frac{1}{2}(z-\mu+\mu)^{2} q(z) d z-\frac{1}{2}$
$=\left(\log \frac{1}{\sigma}\right)+\frac{1}{2}\left(\int(z-\mu)^{2} q(z) d z+\int \mu^{2} q(z) d z+2 \int(z-\mu)(\mu) d z\right)-\frac{1}{2}$
观察最后一项积分项,是求期望的公式,因此结果为0
综上可以得到结果 $D_{K L}\left(q_{\phi}(z \mid x)|| p_{\theta}(z)\right)=\left(\log \frac{1}{\sigma}\right)+\frac{\sigma^{2}+\mu^{2}}{2}-\frac{1}{2}$
另一项 $E_{z}\left[\log \left(p_{\theta}(x \mid z)\right)\right],$ 是关于x的后验概率的对数似然,在VAE 中并不对decoder做太强的假设,一般通过一个神经网络来得到正态分 布的均值和方差,因此这一项不能通过解析求出,所以采用采样的方式: $E_{z}\left[\log \left(p_{\theta}(x \mid z)\right)\right]=\frac{1}{L} \sum_{j=1}^{L} \log p_{\theta}\left(x^{i} \mid z^{j}\right)$

++++++++++++++++++++++++++++++++++++++++++++++

最后,我们从auto-encoder的角度来理解VAE,下图给出了VAE训练的时候的网络结构(以实值样本为例, 注意下面两个图中的
$\displaystyle \epsilon$ 节点并不是bias!而是噪声变量,它的维数与 ** $\displaystyle \text z$
**相同。
):

训练好了以后,生成样本采用下面的网络结构:

VAE实验效果

作者在Frey
face数据集和MNIST数据集上进行实验,实验得到的数据流形分布如下图所示,可以看出,VAE能够捕捉到图像的结构变化(倾斜角度、圈的位置、形状变化、表情变化等)。这也是VAE的一个好处,它有显式的分布,能够容易地可视化图像的分布。GANs虽然不具有显式的图像分布,但是可以通过对隐变量的插值变化来可视化图像的分布(参见
DCGAN
)。

VAE在不同维数的隐变量空间( $\displaystyle \text z$ )下生成手写数字的效果如下:

可以看出,采用MLP也能产生效果还不错的数字,有趣的是,隐变量维数较低时,生成的图像笔画清晰,但是带有较大的噪声(模糊);隐变量维数高时,生成的数字部分笔画不清晰,但噪声小。

代码

VAEs网上的代码很多,下面给了三个基于原始论文[1]的代码,作者修改了激活函数和优化方法以取得更好的收敛性。第四个代码是caffe版本,基于文献[2]。

Tensorflow版本: y0ast/VAE-TensorFlow: Implementation of a Variational Auto-
Encoder in TensorFlow

Torch版本: y0ast/VAE-Torch: Implementation of Variational Auto-Encoder in
Torch7

Theano版本: [ y0ast/Variational-Autoencoder: Implementation of a variational
Auto-encoder
](https://link.zhihu.com/?target=https%3A//github.com/y0ast/Variational-
Autoencoder)

Caffe版本: Tutorial on Variational Autoencoders

参考文献

[1]. Kingma D P, Welling M. Auto-Encoding Variational Bayes[J]. stat, 2014,
1050: 10.

[2]. DOERSCH C. Tutorial on Variational Autoencoders[J]. stat, 2016, 1050: 13.

[3]. Blei, David M., “Variational Inference.” Lecture from Princeton,
[ https://www. cs.princeton.edu/course
s/archive/fall11/cos597C/lectures/variational-inference-i.pdf
](https://link.zhihu.com/?target=https%3A//www.cs.princeton.edu/courses/archive/fall11/cos597C/lectures/variational-
inference-i.pdf) .

Pytorch学习之十九种损失函数

Pytorch学习之十九种损失函数

损失函数通过torch.nn包实现,

1 基本用法

criterion = LossCriterion() #构造函数有自己的参数
loss = criterion(x, y) #调用标准时也有参数2

2 损失函数

2-1 L1范数损失 L1Loss

计算 output 和 target 之差的绝对值。

torch.nn.L1Loss(reduction=’mean’)参数:

reduction-三个值,none: 不使用约简;mean:返回loss和的平均值; sum:返回loss的和。默认:mean。

2-2 均方误差损失 MSELoss

计算 output 和 target 之差的均方差。

torch.nn.MSELoss(reduction=’mean’)参数:

reduction-三个值,none: 不使用约简;mean:返回loss和的平均值; sum:返回loss的和。默认:mean。

2-3 交叉熵损失 CrossEntropyLoss

当训练有 C 个类别的分类问题时很有效. 可选参数 weight 必须是一个1维 Tensor, 权重将被分配给各个类别. 对于不平衡的训练集非常有效。
在多分类任务中,经常采用 softmax 激活函数+交叉熵损失函数,因为交叉熵描述了两个概率分布的差异,然而神经网络输出的是向量,并不是概率分布的形式。所以需要 softmax激活函数将一个向量进行“归一化”成概率分布的形式,再采用交叉熵损失函数计算 loss。

torch.nn.CrossEntropyLoss(weight=None, ignore_index=-100, reduction=’mean’)参数:

weight (Tensor, optional) – 自定义的每个类别的权重. 必须是一个长度为 C 的 Tensor
ignore_index (int, optional) – 设置一个目标值, 该目标值会被忽略, 从而不会影响到 输入的梯度。
reduction-三个值,none: 不使用约简;mean:返回loss和的平均值; sum:返回loss的和。默认:mean。

2-4 KL 散度损失 KLDivLoss

计算 input 和 target 之间的 KL 散度。KL 散度可用于衡量不同的连续分布之间的距离, 在连续的输出分布的空间上(离散采样)上进行直接回归时 很有效.

torch.nn.KLDivLoss(reduction=’mean’)参数:

reduction-三个值,none: 不使用约简;mean:返回loss和的平均值; sum:返回loss的和。默认:mean。

2-5 二进制交叉熵损失 BCELoss

二分类任务时的交叉熵计算函数。用于测量重构的误差, 例如自动编码机. 注意目标的值 t[i] 的范围为0到1之间.

torch.nn.BCELoss(weight=None, reduction=’mean’)参数:

weight (Tensor, optional) – 自定义的每个 batch 元素的 loss 的权重. 必须是一个长度为 “nbatch” 的 的 Tensor
pos_weight(Tensor, optional) – 自定义的每个正样本的 loss 的权重. 必须是一个长度 为 “classes” 的 Tensor

2-6 BCEWithLogitsLoss

BCEWithLogitsLoss损失函数把 Sigmoid 层集成到了 BCELoss 类中. 该版比用一个简单的 Sigmoid 层和 BCELoss 在数值上更稳定, 因为把这两个操作合并为一个层之后, 可以利用 log-sum-exp 的 技巧来实现数值稳定.

torch.nn.BCEWithLogitsLoss(weight=None, reduction=’mean’, pos_weight=None)参数:

weight (Tensor, optional) – 自定义的每个 batch 元素的 loss 的权重. 必须是一个长度 为 “nbatch” 的 Tensor
pos_weight(Tensor, optional) – 自定义的每个正样本的 loss 的权重. 必须是一个长度 为 “classes” 的 Tensor

2-7 MarginRankingLoss

torch.nn.MarginRankingLoss(margin=0.0, reduction=’mean’)对于 mini-batch(小批量) 中每个实例的损失函数如下:

参数:

margin:默认值0

2-8 HingeEmbeddingLoss

torch.nn.HingeEmbeddingLoss(margin=1.0, reduction=’mean’)对于 mini-batch(小批量) 中每个实例的损失函数如下:

参数:

margin:默认值1

2-9 多标签分类损失 MultiLabelMarginLoss

torch.nn.MultiLabelMarginLoss(reduction=’mean’)对于mini-batch(小批量) 中的每个样本按如下公式计算损失:

2-10 平滑版L1损失 SmoothL1Loss

也被称为 Huber 损失函数。

torch.nn.SmoothL1Loss(reduction=’mean’)
其中

2-11 2分类的logistic损失 SoftMarginLoss

torch.nn.SoftMarginLoss(reduction=’mean’)

2-12 多标签 one-versus-all 损失 MultiLabelSoftMarginLoss

torch.nn.MultiLabelSoftMarginLoss(weight=None, reduction=’mean’)

2-13 cosine 损失 CosineEmbeddingLoss

torch.nn.CosineEmbeddingLoss(margin=0.0, reduction=’mean’)
参数:

margin:默认值0

2-14 多类别分类的hinge损失 MultiMarginLoss

torch.nn.MultiMarginLoss(p=1, margin=1.0, weight=None, reduction=’mean’)
参数:

p=1或者2 默认值:1
margin:默认值1

2-15 三元组损失 TripletMarginLoss

torch.nn.TripletMarginLoss(margin=1.0, p=2.0, eps=1e-06, swap=False, reduction=’mean’)
其中:

2-16 连接时序分类损失 CTCLoss

CTC连接时序分类损失,可以对没有对齐的数据进行自动对齐,主要用在没有事先对齐的序列化数据训练上。比如语音识别、ocr识别等等。

torch.nn.CTCLoss(blank=0, reduction=’mean’)参数:

reduction-三个值,none: 不使用约简;mean:返回loss和的平均值; sum:返回loss的和。默认:mean。

2-17 负对数似然损失 NLLLoss

负对数似然损失. 用于训练 C 个类别的分类问题.

torch.nn.NLLLoss(weight=None, ignore_index=-100, reduction=’mean’)参数:

weight (Tensor, optional) – 自定义的每个类别的权重. 必须是一个长度为 C 的 Tensor
ignore_index (int, optional) – 设置一个目标值, 该目标值会被忽略, 从而不会影响到 输入的梯度.

2-18 NLLLoss2d

对于图片输入的负对数似然损失. 它计算每个像素的负对数似然损失.

torch.nn.NLLLoss2d(weight=None, ignore_index=-100, reduction=’mean’)参数:

weight (Tensor, optional) – 自定义的每个类别的权重. 必须是一个长度为 C 的 Tensor
reduction-三个值,none: 不使用约简;mean:返回loss和的平均值; sum:返回loss的和。默认:mean。

2-19 PoissonNLLLoss

目标值为泊松分布的负对数似然损失

torch.nn.PoissonNLLLoss(log_input=True, full=False, eps=1e-08, reduction=’mean’)参数:

log_input (bool, optional) – 如果设置为 True , loss 将会按照公 式 exp(input) - target * input 来计算, 如果设置为 False , loss 将会按照 input - target * log(input+eps) 计算.
full (bool, optional) – 是否计算全部的 loss, i. e. 加上 Stirling 近似项 target * log(target) - target + 0.5 * log(2 * pi * target).
eps (float, optional) – 默认值: 1e-8

CVAE

VAE回顾

VAE的目标是最大化对数似然函数

[公式]

其中,

$\mathcal{L}(\theta, \phi; \text{x}^{(i)}) = \mathbb{E}{q{\phi}(\text{z}|\text{x})} [\log p_{\theta}(\text{x,z}) - \log q_{\phi}(\text{z}|\text{x})]= -KL(q_{\phi}(\text{z}|\text{x}^{(i)})||p_{\theta}(\text{z})) + \mathbb{E}{q{\phi}(\text{z}|\text{x}^{(i)})} \log p_{\theta}(\text{x}^{(i)}|\text{z})$

由于KL散度非负,对数似然函数的变分下界即为上式中的[公式])项。一般来说,[公式])是未知的,或者难以获得显式表达式的,因此,直接优化对数似然函数是不可行的,一般转而优化它的变分下界,即上式中的[公式]项。Diederik P.Kingma和Max Welling提出了两个算法SGVB和AEVB去估计[公式]

CVAE

VAE用的训练集是数据[公式])。当生成数据时,由隐变量[公式])控制生成数据[公式]),如果我们现在有的数据不只是[公式]),我们还有关于数据[公式])的一些额外信息[公式],最简单的,以手写数字为例,它的标签0-9,那么我们是否能够利用上这些额外的信息呢?

CVAE-1

一个简答的想法,考虑条件概率分布[公式],套用原来的VAE模型,我们不难作出以下推导:

$KL(q_{\phi}(\text{z}|\text{x,y})||p_{\theta}(\text{z}|\text{x,y})) = \mathbb{E}{q{\phi}(\text{z}|\text{x,y})} \log \frac{q_{\phi}(\text{z}|\text{x,y})}{p_{\theta}(\text{z}|\text{x,y})} \
= \mathbb{E}{q{\phi}(\text{z}|\text{x,y})} \log \frac{q_{\phi}(\text{z}|\text{x,y}) p_{\theta}(\text{x}|\text{y})}{p_{\theta}(\text{z}|\text{x,y}) p_{\theta}(\text{x}|\text{y})} \
= \mathbb{E}{q{\phi}(\text{z}|\text{x,y})} \log \frac{q_{\phi}(\text{z}|\text{x,y}) p_{\theta}(\text{x}|\text{y})}{p_{\theta}(\text{x,z}|\text{y})} \
= KL(q_{\phi}(\text{z}|\text{x,y}) || p_{\theta}(\text{x,z}|\text{y})) + \log p_{\theta}(\text{x}|\text{y}))$

于是

[公式]

其中,

$\mathcal{L}(\theta,\phi;\text{x,y}) = -KL(q_{\phi}(\text{z}|\text{x,y}) || p_{\theta}(\text{x,z}|\text{y})) \
= \mathbb{E}{q{\phi}(\text{z}|\text{x,y})} [\log p_{\theta}(\text{x,z}|\text{y}) - \log q_{\phi}(\text{z}|\text{x,y})] \
= -KL(q_{\phi}(\text{z}|\text{x,y})||p_{\theta}(\text{z}|\text{y})) + \mathbb{E}{q{\phi}(\text{z}|\text{x,y})} \log p_{\theta}(\text{x}|\text{y,z})$

类似于VAE,套用SGVB算法,再做一下reparameterization,取适当的分布和网络,我们就得到了一个CVAE模型。

我们姑且称这个版本的CVAE为CVAE-1模型,没错,CVAE模型不止一个……

CVAE-2

此外,与CGAN一样,我们一般假设额外信息[公式])与隐变量[公式])没有直接的关系,因此条件概率[公式],于是变分下界可以写成

[公式]

这在文献[3]中提到过。姑且称这个版本为CVAE-2模型。

CVAE-3

这就完了吗?文献[2]会告诉你,不要着急,我们也提出了一种CVAE。文中提出的方法不是产生数据[公式]),而是直接考虑预测问题:预测数据[公式])的标签[公式])。什么意思呢?它的似然函数是[公式])而不是[公式])。而这个推导也不难,事实上,把[公式])看成我们要生成的“数据”,[公式])看成是“标签”,在上面推导的结果里面直接交换[公式]的位置,就得到了

[公式]

其中,

$\mathcal{L}(\theta,\phi;\text{x,y}) = -KL(q_{\phi}(\text{z}|\text{x,y}) || p_{\theta}(\text{y,z}|\text{x})) \
= \mathbb{E}{q{\phi}(\text{z}|\text{x,y})} [\log p_{\theta}(\text{y,z}|\text{x}) - \log q_{\phi}(\text{z}|\text{x,y})] \
= -KL(q_{\phi}(\text{z}|\text{x,y})||p_{\theta}(\text{z}|\text{x})) + \mathbb{E}{q{\phi}(\text{z}|\text{x,y})} \log p_{\theta}(\text{y}|\text{x,z})$

同样地,对[公式])做一下reparameterization,写成[公式])。再取适当的分布和网络,就可以了。值得一提的是,我们会在模型中设定适当的分布[公式]),当训练完了以后,可以把模型当成一个分类器,预测输入[公式]的标签:

[公式]

上面的预测涉及到求期望,除非有显式结果,否则一般采用均值去近似期望:

[公式]

姑且这个模型称为CVAE-3,它的图模型结构如下:

img

CVAE-4

非常抱歉地告诉你,CVAE模型还没完。文献[3]提出了CMMA模型(conditional multimodal autoencoder),实际上它也可以看成是条件版本的VAE。一般来说,我们考虑的CVAE或者CGAN的图模型是长这样的:

img

它的特点是[公式]一般是相互独立的。而CMMA考虑的图模型是长这样的:

img

这个模型的特点是隐变量是由额外信息[公式])确定的,[公式])。整个推导过程跟CVAE-1一模一样,应用[公式]以后,变分下界可以简化为:

[公式]

姑且称CMMA模型为CVAE-4。CVAE-4模型将标签信息编码到隐变量[公式]中,作者指出,这样做的效果更好。

当然,针对具体的问题,还有一些不一样的CVAE设计,例如,文献[1]用CVAE做半监督学习,用到的CVAE又与上面介绍的有所不同。根据具体问题,有些模型还会对目标函数添加一些惩罚项。

VAE是个贝叶斯模型,它的条件概率版本根据取条件概率的形式的不同,自然会出现多种多样的模型。

代码

\1. RuiShu/cvae: Conditional variational autoencoder implementation in Torch

\2. kastnerkyle/SciPy2015: Talk for SciPy2015 “Deep Learning: Tips From The Road”

\3. Tutorial on Variational Autoencoders

\4. dpkingma/nips14-ssl: Code for reproducing results of NIPS 2014 paper “Semi-Supervised Learning with Deep Generative Models”

\5. jramapuram/CVAE: Convolutional Variational Autoencoder

参考文献

\1. Kingma D P, Mohamed S, Rezende D J, et al. Semi-supervised learning with deep generative models[C]//Advances in Neural Information Processing Systems. 2014: 3581-3589.

\2. Sohn K, Lee H, Yan X. Learning structured output representation using deep conditional generative models[C]//Advances in Neural Information Processing Systems. 2015: 3483-3491.

\3. Pandey G, Dukkipati A. Variational methods for conditional multimodal learning: Generating human faces from attributes. arXiv preprint[J]. arXiv, 2016, 1603.

\4. Walker J, Doersch C, Gupta A, et al. An uncertain future: Forecasting from static images using variational autoencoders[C]//European Conference on Computer Vision. Springer International Publishing, 2016: 835-851.

\5. Doersch C. Tutorial on variational autoencoders[J]. arXiv preprint arXiv:1606.05908, 2016.

远程深度学习,有这一篇小计就够了

远程深度学习,有这一篇小计就够了

转载

作者:北静王
链接:https://www.jianshu.com/p/cfcc2b197308
来源:简书

没有GPU搞什么深度学习,用嘴么。

在服务器上运行代码的时候一定一定一定要给别的用户留出一定的使用空间

终于从纸上谈兵到实际编码操作,切忌自己独占系统资源。本篇小记重点讲:

  1. 怎么远程调试代码
  2. 怎么远程运行代码
  3. 深度学习的设置

零、关于远程服务器的一些小诀窍

1. 关于怎么选择GPU和限制显存问题。

Tensorflow默认是占尽全部显存的,即使你的代码网络结构不占用很大的现存的时候,tf也会默认全部申请是为了在程序运行的过程中直接取用不用再申请操作显存,所有有的时候回看到明明是一个很小的代码却占尽了GPU显存,但是GPU得计算力却还不到30%,尤其是在多个CPU的时候,每块GPU的显存都申请满了,而只有一颗GPU在跑程序。所以我们有必要手动的修改下自己的代码,只需要在关键的地方添上几句代码,就会限制显存使用,同时还能指定跑程序的GPU。如果参数选择的正确的话对程序的运行速度是没有限制的。

1
CUDA_VISIBLE_DEVICES=0 python nn.py

将Tensoeflow的命令行参数写在python之前,指明你要使用的GPU,0代表第一块GPU,0,1代表使用设备号是0和1的两块GPU。

1
2
3
4
5
6
7
8
使用tf.flags 传递参数
在session中使用限制显存的参数


tf.app.flags.DEFINE_float('mr',0.5,'allocate GPU memory rate')
FLAGS=tf.app.flags.FLAGS
gpu_options = tf.GPUOptions(per_process_gpu_memory_fraction=FLAGS.mr)
session = tf.Session(config=tf.ConfigProto(gpu_options=gpu_options))

上面的GPUOptions就限制了你的显存的使用率。并且我们使用tf.flags可以直接运行python程序的时候通过命令行参数来指定这个分配现存的大小。

1
2
# 使用第一块GPU,并且只使用第一块GPU20%的显存做计算。
CUDA_VISIBLE_DEVICES=0 python nn.py --mr=0.2

2. 后台运行

只需要在运行命令行之后添加一个&符号便可以将当前的进程挂到后台。但是一定要记得如果不再使用当前进程的话,用Ctrl+c是杀不掉的,一定要使用kill命令杀线程。

在挂后台的时候,会返给命令行一个PID,就是进程的ID号,最好记下来这个ID号,因为你手动杀进程的时候需要使用这个ID号,一定不能记错了,否则杀了别人的进程是小事,把系统搞奔溃了可就麻烦了。

1
2
# -s 9 代表着强制杀掉进程,百杀百中
sudo kill -s 9 PID

有时候忘记了进程号,我们需要查找当前活跃的进程,然后找到这个进程号。

1
ps -ef | grep "python"

这里是两个shell命令通过管道进行了结合,第一个ps能够列出当前系统所有活跃的进程,然后通过grep 关键字查找就能找到带有关键字的进程。找到PID(PID是输出的第二列那个数字)再杀掉。

1
2
3
4
# 查看当前使用的登录终端ID,
他的输出也可以当做前面的grep的关键字来进行线程的查询,
但是要记住使用同一个窗口。
tty

最好的方法是通过你运行的终端的命令来进行关键词查找,这样最准确。

img

挺简单的

3. 使用ssh-keygen 完成免密码登录

img

只使用f3一个命令就完成了免密码登录

4. 监视服务器运行状态的小命令

1
htop  #监视内存,线程,CPU运行状态

img

Screen Shot 2018-01-10 at 23.16.59.png

1
watch -n 0.2 nvidia-smi #监视GPU,每隔0.2s 刷新

img

Screen Shot 2018-01-10 at 23.17.05.png

一、 远程调试代码

必备条件:

  • Pycharm pro(一定要是pro版本,负责不支持以下操作)
  • Shell (有兴趣的同学可以去设置zsh和iterm2)
  • conda (主要是为了服务器用户隔离)

步骤:
Pycharm pro中有许多很牛逼很帅的高级功能,现在我们需要用到的是【development】功能来实现远程的python脚本的修改调试。此功能在【tools】->【development】中。

img

选中Configuration功能进行配置

下面就是使用类ssh的功能来远程连接主机了,请确定你已经在远程服务器上面添加了自己的账户。

img

配置

name则是整个配置的名称,随便你命名。
Type选择SFTP。
host直接填写远程服务器的IP地址(例如:xxx.xxx.xxx.xxx)。
Root path则是你远程服务器上面的代码存放位置,我一般就是在我的用户目录下直接建立code,这样比较方便。
User namePassword则是你远程服务上的用户名和密码。

img

本地和远程的mapping的设置

localPath就是你本地的项目上的代码位置,如果你是用Pycharm pro直接open的项目的话,name这个地方是自动填充自己的项目位置的。
Development Path on sever '***' 则是你在服务上要上传代码的位置。上传完成之后会在服务器的Root path下新建一个文件夹,就是这个名称。
Web path这个不用管。

之后需要设置Pycharm,让他在远程服务器上能够建立文件夹,这样即使我们首次上传也不会出现远程服务器没有文件夹的问题。
还是在之前【development】那里,这次我们选择的是下面的【options】选项。将第五个checkbox create empty directories勾选上就可以了。

img

Screen Shot 2018-01-10 at 22.50.13.png

下面就可以上传本地的项目到远程的服务器上面了。不过在此之前请确定你远程的服务器上有你的用户,并且你的用户目录有write权限,关于用户权限你可以用ls -l查看目录下的文件,第一列就列出了用户权限。请自行百度,如果你自己的用户在你用户目录下没有write的权限的话,那么即使连接上了远程服务器也不能成功上传,原因就是你没有建立文件夹和文件的权限。可以使用下面的命令修复。

1
2
3
4
5
6
ls -l

显示
-rwxr-xr-x 1 root root 6444 09-22 15:33 shmwrite
-rw-r--r-- 1 root root 1443 09-22 15:33 shmwrite.c
drwxr-xr-x 2 root root 4096 09-22 17:19 test

第一个字符代表文件类型。d代表目录,-代表非目录。

接下来每三个字符为一组权限,分为三组,依次代表所有者权限,同组用户权限,其它用户权限.每组权限的三个字符依次代表是否可读,是否可写,是否可执行

r 表示拥有读的权限
w 表示拥有写的权限
x 表示拥有可执行的权限
- 表示没有该权限

修改权限
可用chmod命令来修改文件权限。

1
2
3
sudo chmod -R XXX floderName
sudo chmod XXX fileName
sudo chown user:group fileName

前两条命令表示改变文件属性(文件三种属性,read-可读,write-可写,x-可执行)。按照二进制来计算没组权限的属性就OK了,具体的请自行学习查询,这里不展开了。

然后我们在Pycharm pro中的项目上,鼠标右键菜单下部会出现upload to name选项,选择以后就能完成文件的上传了。

img

当我们修改了某一个文件时候,也可以单独上传一个文件

二、设置远程调试解析器

远程服务器上一般安装有conda和virtualenv虚拟软件,大家一定一定一定要花点时间来学习conda的虚拟环境,一定一定一定不要和别人公用虚拟环境,一般自己的虚拟环境自己维护,用自己的用户名做前缀防止别人给你修改。这对服务器的维护和软件的运行都是很有益处的。

假设你已经在服务器上建立好了自己的python虚拟环境,那么下一步就是设置Pycharm的解释器了。我们只需要将解释器的位置设置为远程地址就行。

首先查看你远程服务器上的虚拟环境中的python解释器的位置。找到anaconda的安装位置,一般安装的人是为一个用户安装的也就是root用户,此时你需要找到root用户下的conda的位置。然后在env文件下找到你的虚拟环境目录,然后在/bin目录下查找python2.7。

img

添加Remote Interpreters

稍后Pycharm会从远程的服务器上pull下服务器的conda环境到本机。完成之后就能debug远程服务器的代码了。

img

调试窗口

我们可以从调试窗口第一行的启动命令看出,此时候用的是远程的解释器。这样再也不用担心自己的笔记本运行不了了,还得一遍一遍的修改上传再启动。

COCO 数据集目标检测等相关评测指标

COCO 数据集目标检测等相关评测指标

转载自 https://www.aiuai.cn/aifarm854.html

COCO Detection Evaluation

1. 评测指标定义

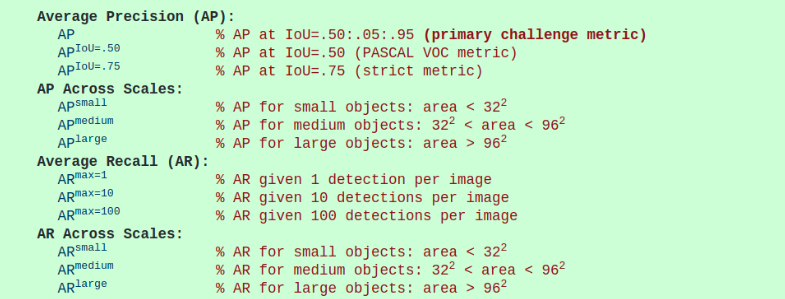
COCO 提供了 12 种用于衡量目标检测器性能的评价指标.

image

image

[1] - 除非特别说明,AP 和 AR 一般是在多个 IoU(Intersection over Union) 值间取平均值. 具体地,采用了 10 个 IoU阈值 - 0.50:0.05:0.95. 对比于传统的只计算单个 IoU 阈值(0.50)的指标(对应于这里的指标 APIoU=0.50),这是一种突破. 对多个 IoU 阈值求平均,能够使得目标检测器具有更好的定位位置.

[2] - AP 是对所有类别的求平均值. 这在传统上被称为平均准确度(mAP, mean average precision). 这里并未区分 AP 和 mAP(类似的,AR 和mAR),假定从上下文中具有清晰的差异. 即:如,AP50=mAP50,AP75=mAP75,… 但,AP50 一定大于 AP75.

[3] - AP (所有 10 个 IoU 阈值和全部 80 个类别的平均值) 作为最终 COCO竞赛胜者的标准. 在考虑目标检测器再 COCO 上的性能时,这是单个最重要的评价度量指标.

[4] - COCO数据集中小目标物体数量比大目标物体更多. 具体地,标注的约有 41% 的目标物体是都很小的(small, 面积< 32x32=1024),约有 34% 的目标物体是中等的(medium, 1024=32x32 < 面积 < 96x96=9216),约有 24% 的目标物体是大的(large, 面积 > 96x96=9216). 面积(area) 是指 segmentation mask 中像素的数量.

[5] - AR 是指每张图片中,在给定固定数量的检测结果中的最大召回(maximum recall),在所有 IoUs 和全部类别上求平均值. AR 与 proposal evaluation 中所使用的相同,但这里 AR 是按类别计算的.

[6] - 所有的评测指标允许每张图片(在全部的类别中)最多 100 个 top-scoring 检测结果进行计算.

[7] - 边界框(bounding boxes)的检测和segmentation mask 的所有评测指标是一致的,除了 IoU 的计算. 边界框的 IoU 计算是关于 boxes的 ,而 segmentation mask 的 IoU 计算是关于 masks 的.

2. 评测指标实现 - cocoeval

PythonAPI/pycocotools/cocoeval.py

评测参数如 :(括号里的默认值,一般不需要修改.)

image

image

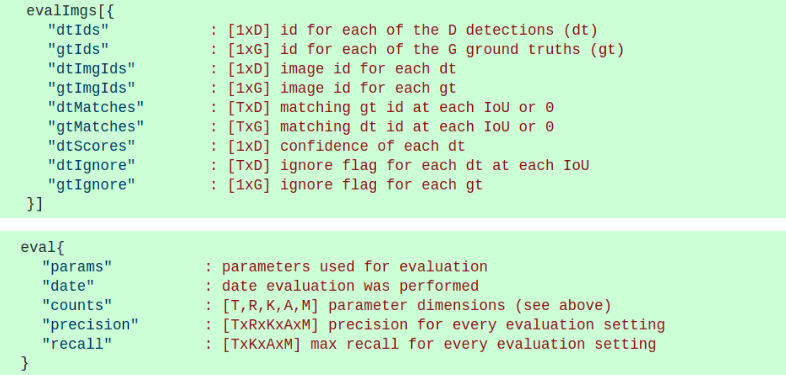
通过调用 evaluate() 函数和 accumulate() 函数来运行,以计算得到衡量检测质量的两个数据结构(data structures).

这两个数据结构分别是 evalImageseval,其分别每张图片的检测质量和整个数据集上的聚合检测质量.

数据结构 evalImages 共有 KxA 个元素,每个元素表示一个评测设置;而数据结构 eval 将这些信息组合为 precision 和 recall 数组. 具体如下:

image

image

Python 中的定义如:

1
2
3
4
5
6
7
8
9
10
11
12
13
14
15
16
17
18
19
20
21
22
23
24
25
26
27
28
29
30
31
32
33
34
35
36
37
38
39
40
41
42
43
44
45
46
47
48
49
50
51
52
53
54
55
56
57
58
59
60
61
62
63
64
65
66
67
68
69
70
71
72
73
74
75
76
77
78
79
80
81
82
83
84
85
86
87
88
89
90
91
92
93
94
95
96
97
98
99
100
101
102
103
104
105
106
107
108
109
110
111
112
113
114
115
116
117
118
119
120
121
122
123
124
125
126
127
128
129
130
131
132
133
134
135
136
137
138
139
140
141
142
143
144
145
146
147
148
149
150
151
152
153
154
155
156
157
158
159
160
161
162
163
164
165
166
167
168
169
170
171
172
173
174
175
176
177
178
179
180
181
182
183
184
185
186
187
188
189
190
191
192
193
194
195
196
197
198
199
200
201
202
203
204
205
206
207
208
209
210
211
212
213
214
215
216
217
218
219
220
221
222
223
224
225
226
227
228
229
230
231
232
233
234
235
236
237
238
239
240
241
242
243
244
245
246
247
248
249
250
251
252
253
254
255
256
257
258
259
260
261
262
263
264
265
266
267
268
269
270
271
272
273
274
275
276
277
278
279
280
281
282
283
284
285
286
287
288
289
290
291
292
293
294
295
296
297
298
299
300
301
302
303
304
305
306
307
308
309
310
311
312
313
314
315
316
317
318
319
320
321
322
323
324
325
326
327
328
329
330
331
332
333
334
335
336
337
338
339
340
341
342
343
344
345
346
347
348
349
350
351
352
353
354
355
356
357
358
359
360
361
362
363
364
365
366
367
368
369
370
371
372
373
374
375
376
377
378
379
380
381
382
383
384
385
386
387
388
389
390
391
392
393
394
395
396
397
398
399
400
401
402
403
404
405
406
407
408
409
410
411
412
413
414
415
416
417
418
419
420
421
422
423
424
425
426
427
428
429
430
431
432
433
434
435
436
437
438
439
440
441
442
443
444
445
446
447
448
449
450
451
452
453
454
455
456
457
458
459
460
461
462
463
464
465
466
467
468
469
470
471
472
473
474
475
476
477
478
479
480
481
482
483
484
485
486
487
488
489
490
491
492
493
494
495
496
497
498
499
500
501
502
503
504
505
506
507
508
509
510
511
512
513
514
515
516
517
518
519
520
521
522
523
524
525
526
527
528
529
__author__ = 'tsungyi'

import numpy as np
import datetime
import time
from collections import defaultdict
from . import mask as maskUtils
import copy

class COCOeval:
# COCO 数据集的检测评估接口.
# The usage for CocoEval is as follows:
# cocoGt=..., cocoDt=... # load dataset and results
# E = CocoEval(cocoGt,cocoDt); # initialize CocoEval object
# E.params.recThrs = ...; # set parameters as desired
# E.evaluate(); # run per image evaluation
# E.accumulate(); # accumulate per image results
# E.summarize(); # display summary metrics of results
# For example usage see evalDemo.m and http://mscoco.org/.
#
# The evaluation parameters are as follows (defaults in brackets):
# imgIds - [all] N img ids to use for evaluation
# catIds - [all] K cat ids to use for evaluation
# iouThrs - [.5:.05:.95] T=10 IoU thresholds for evaluation
# recThrs - [0:.01:1] R=101 recall thresholds for evaluation
# areaRng - [...] A=4 object area ranges for evaluation
# maxDets - [1 10 100] M=3 thresholds on max detections per image
# iouType - ['segm'] set iouType to 'segm', 'bbox' or 'keypoints'
# iouType replaced the now DEPRECATED useSegm parameter.
# useCats - [1] if true use category labels for evaluation
# Note: if useCats=0 category labels are ignored as in proposal scoring.
# Note: multiple areaRngs [Ax2] and maxDets [Mx1] can be specified.
#
# evaluate(): evaluates detections on every image and every category and
# concats the results into the "evalImgs" with fields:
# dtIds - [1xD] id for each of the D detections (dt)
# gtIds - [1xG] id for each of the G ground truths (gt)
# dtMatches - [TxD] matching gt id at each IoU or 0
# gtMatches - [TxG] matching dt id at each IoU or 0
# dtScores - [1xD] confidence of each dt
# gtIgnore - [1xG] ignore flag for each gt
# dtIgnore - [TxD] ignore flag for each dt at each IoU
#
# accumulate(): accumulates the per-image, per-category evaluation
# results in "evalImgs" into the dictionary "eval" with fields:
# params - parameters used for evaluation
# date - date evaluation was performed
# counts - [T,R,K,A,M] parameter dimensions (see above)
# precision - [TxRxKxAxM] precision for every evaluation setting
# recall - [TxKxAxM] max recall for every evaluation setting
# Note: precision and recall==-1 for settings with no gt objects.
#
# See also coco, mask, pycocoDemo, pycocoEvalDemo
#
def __init__(self, cocoGt=None, cocoDt=None, iouType='segm'):
'''
Initialize CocoEval using coco APIs for gt and dt
:param cocoGt: coco object with ground truth annotations
:param cocoDt: coco object with detection results
:return: None
'''
if not iouType:
print('iouType not specified. use default iouType segm')
self.cocoGt = cocoGt # ground truth COCO API
self.cocoDt = cocoDt # detections COCO API
self.params = {} # evaluation parameters
self.evalImgs = defaultdict(list) # per-image per-category evaluation results [KxAxI] elements
self.eval = {} # accumulated evaluation results
self._gts = defaultdict(list) # gt for evaluation
self._dts = defaultdict(list) # dt for evaluation
self.params = Params(iouType=iouType) # parameters
self._paramsEval = {} # parameters for evaluation
self.stats = [] # result summarization
self.ious = {} # ious between all gts and dts
if not cocoGt is None:
self.params.imgIds = sorted(cocoGt.getImgIds())
self.params.catIds = sorted(cocoGt.getCatIds())


def _prepare(self):
'''
Prepare ._gts and ._dts for evaluation based on params
:return: None
'''
def _toMask(anns, coco):
# modify ann['segmentation'] by reference
for ann in anns:
rle = coco.annToRLE(ann)
ann['segmentation'] = rle
p = self.params
if p.useCats:
gts=self.cocoGt.loadAnns(self.cocoGt.getAnnIds(imgIds=p.imgIds, catIds=p.catIds))
dts=self.cocoDt.loadAnns(self.cocoDt.getAnnIds(imgIds=p.imgIds, catIds=p.catIds))
else:
gts=self.cocoGt.loadAnns(self.cocoGt.getAnnIds(imgIds=p.imgIds))
dts=self.cocoDt.loadAnns(self.cocoDt.getAnnIds(imgIds=p.imgIds))

# convert ground truth to mask if iouType == 'segm'
if p.iouType == 'segm':
_toMask(gts, self.cocoGt)
_toMask(dts, self.cocoDt)
# set ignore flag
for gt in gts:
gt['ignore'] = gt['ignore'] if 'ignore' in gt else 0
gt['ignore'] = 'iscrowd' in gt and gt['iscrowd']
if p.iouType == 'keypoints':
gt['ignore'] = (gt['num_keypoints'] == 0) or gt['ignore']
self._gts = defaultdict(list) # gt for evaluation
self._dts = defaultdict(list) # dt for evaluation
for gt in gts:
self._gts[gt['image_id'], gt['category_id']].append(gt)
for dt in dts:
self._dts[dt['image_id'], dt['category_id']].append(dt)
self.evalImgs = defaultdict(list) # per-image per-category evaluation results
self.eval = {} # accumulated evaluation results

def evaluate(self):
'''
Run per image evaluation on given images and store results (a list of dict) in self.evalImgs
:return: None
'''
tic = time.time()
print('Running per image evaluation...')
p = self.params
# add backward compatibility if useSegm is specified in params
if not p.useSegm is None:
p.iouType = 'segm' if p.useSegm == 1 else 'bbox'
print('useSegm (deprecated) is not None. Running {} evaluation'.format(p.iouType))
print('Evaluate annotation type *{}*'.format(p.iouType))
p.imgIds = list(np.unique(p.imgIds))
if p.useCats:
p.catIds = list(np.unique(p.catIds))
p.maxDets = sorted(p.maxDets)
self.params=p

self._prepare()
# loop through images, area range, max detection number
catIds = p.catIds if p.useCats else [-1]

if p.iouType == 'segm' or p.iouType == 'bbox':
computeIoU = self.computeIoU
elif p.iouType == 'keypoints':
computeIoU = self.computeOks
self.ious = {(imgId, catId): computeIoU(imgId, catId) \
for imgId in p.imgIds
for catId in catIds}

evaluateImg = self.evaluateImg
maxDet = p.maxDets[-1]
self.evalImgs = [evaluateImg(imgId, catId, areaRng, maxDet)
for catId in catIds
for areaRng in p.areaRng
for imgId in p.imgIds
]
self._paramsEval = copy.deepcopy(self.params)
toc = time.time()
print('DONE (t={:0.2f}s).'.format(toc-tic))

def computeIoU(self, imgId, catId):
p = self.params
if p.useCats:
gt = self._gts[imgId,catId]
dt = self._dts[imgId,catId]
else:
gt = [_ for cId in p.catIds for _ in self._gts[imgId,cId]]
dt = [_ for cId in p.catIds for _ in self._dts[imgId,cId]]
if len(gt) == 0 and len(dt) ==0:
return []
inds = np.argsort([-d['score'] for d in dt], kind='mergesort')
dt = [dt[i] for i in inds]
if len(dt) > p.maxDets[-1]:
dt=dt[0:p.maxDets[-1]]

if p.iouType == 'segm':
g = [g['segmentation'] for g in gt]
d = [d['segmentation'] for d in dt]
elif p.iouType == 'bbox':
g = [g['bbox'] for g in gt]
d = [d['bbox'] for d in dt]
else:
raise Exception('unknown iouType for iou computation')

# compute iou between each dt and gt region
iscrowd = [int(o['iscrowd']) for o in gt]
ious = maskUtils.iou(d,g,iscrowd)
return ious

def computeOks(self, imgId, catId):
p = self.params
# dimention here should be Nxm
gts = self._gts[imgId, catId]
dts = self._dts[imgId, catId]
inds = np.argsort([-d['score'] for d in dts], kind='mergesort')
dts = [dts[i] for i in inds]
if len(dts) > p.maxDets[-1]:
dts = dts[0:p.maxDets[-1]]
# if len(gts) == 0 and len(dts) == 0:
if len(gts) == 0 or len(dts) == 0:
return []
ious = np.zeros((len(dts), len(gts)))
sigmas = np.array([.26, .25, .25, .35, .35, .79, .79, .72, .72, .62,.62, 1.07, 1.07, .87, .87, .89, .89])/10.0
vars = (sigmas * 2)**2
k = len(sigmas)
# compute oks between each detection and ground truth object
for j, gt in enumerate(gts):
# create bounds for ignore regions(double the gt bbox)
g = np.array(gt['keypoints'])
xg = g[0::3]; yg = g[1::3]; vg = g[2::3]
k1 = np.count_nonzero(vg > 0)
bb = gt['bbox']
x0 = bb[0] - bb[2]; x1 = bb[0] + bb[2] * 2
y0 = bb[1] - bb[3]; y1 = bb[1] + bb[3] * 2
for i, dt in enumerate(dts):
d = np.array(dt['keypoints'])
xd = d[0::3]; yd = d[1::3]
if k1>0:
# measure the per-keypoint distance if keypoints visible
dx = xd - xg
dy = yd - yg
else:
# measure minimum distance to keypoints in (x0,y0) & (x1,y1)
z = np.zeros((k))
dx = np.max((z, x0-xd),axis=0)+np.max((z, xd-x1),axis=0)
dy = np.max((z, y0-yd),axis=0)+np.max((z, yd-y1),axis=0)
e = (dx**2 + dy**2) / vars / (gt['area']+np.spacing(1)) / 2
if k1 > 0:
e=e[vg > 0]
ious[i, j] = np.sum(np.exp(-e)) / e.shape[0]
return ious

def evaluateImg(self, imgId, catId, aRng, maxDet):
'''
perform evaluation for single category and image
:return: dict (single image results)
'''
p = self.params
if p.useCats:
gt = self._gts[imgId,catId]
dt = self._dts[imgId,catId]
else:
gt = [_ for cId in p.catIds for _ in self._gts[imgId,cId]]
dt = [_ for cId in p.catIds for _ in self._dts[imgId,cId]]
if len(gt) == 0 and len(dt) ==0:
return None

for g in gt:
if g['ignore'] or (g['area']<aRng[0] or g['area']>aRng[1]):
g['_ignore'] = 1
else:
g['_ignore'] = 0

# sort dt highest score first, sort gt ignore last
gtind = np.argsort([g['_ignore'] for g in gt], kind='mergesort')
gt = [gt[i] for i in gtind]
dtind = np.argsort([-d['score'] for d in dt], kind='mergesort')
dt = [dt[i] for i in dtind[0:maxDet]]
iscrowd = [int(o['iscrowd']) for o in gt]
# load computed ious
ious = self.ious[imgId, catId][:, gtind] if len(self.ious[imgId, catId]) > 0 else self.ious[imgId, catId]

T = len(p.iouThrs)
G = len(gt)
D = len(dt)
gtm = np.zeros((T,G))
dtm = np.zeros((T,D))
gtIg = np.array([g['_ignore'] for g in gt])
dtIg = np.zeros((T,D))
if not len(ious)==0:
for tind, t in enumerate(p.iouThrs):
for dind, d in enumerate(dt):
# information about best match so far (m=-1 -> unmatched)
iou = min([t,1-1e-10])
m = -1
for gind, g in enumerate(gt):
# if this gt already matched, and not a crowd, continue
if gtm[tind,gind]>0 and not iscrowd[gind]:
continue
# if dt matched to reg gt, and on ignore gt, stop
if m>-1 and gtIg[m]==0 and gtIg[gind]==1:
break
# continue to next gt unless better match made
if ious[dind,gind] < iou:
continue
# if match successful and best so far, store appropriately
iou=ious[dind,gind]
m=gind
# if match made store id of match for both dt and gt
if m ==-1:
continue
dtIg[tind,dind] = gtIg[m]
dtm[tind,dind] = gt[m]['id']
gtm[tind,m] = d['id']
# set unmatched detections outside of area range to ignore
a = np.array([d['area']<aRng[0] or d['area']>aRng[1] for d in dt]).reshape((1, len(dt)))
dtIg = np.logical_or(dtIg, np.logical_and(dtm==0, np.repeat(a,T,0)))
# store results for given image and category
return {
'image_id': imgId,
'category_id': catId,
'aRng': aRng,
'maxDet': maxDet,
'dtIds': [d['id'] for d in dt],
'gtIds': [g['id'] for g in gt],
'dtMatches': dtm,
'gtMatches': gtm,
'dtScores': [d['score'] for d in dt],
'gtIgnore': gtIg,
'dtIgnore': dtIg,
}

def accumulate(self, p = None):
'''
Accumulate per image evaluation results and store the result in self.eval
:param p: input params for evaluation
:return: None
'''
print('Accumulating evaluation results...')
tic = time.time()
if not self.evalImgs:
print('Please run evaluate() first')
# allows input customized parameters
if p is None:
p = self.params
p.catIds = p.catIds if p.useCats == 1 else [-1]
T = len(p.iouThrs)
R = len(p.recThrs)
K = len(p.catIds) if p.useCats else 1
A = len(p.areaRng)
M = len(p.maxDets)
precision = -np.ones((T,R,K,A,M)) # -1 for the precision of absent categories
recall = -np.ones((T,K,A,M))
scores = -np.ones((T,R,K,A,M))

# create dictionary for future indexing
_pe = self._paramsEval
catIds = _pe.catIds if _pe.useCats else [-1]
setK = set(catIds)
setA = set(map(tuple, _pe.areaRng))
setM = set(_pe.maxDets)
setI = set(_pe.imgIds)
# get inds to evaluate
k_list = [n for n, k in enumerate(p.catIds) if k in setK]
m_list = [m for n, m in enumerate(p.maxDets) if m in setM]
a_list = [n for n, a in enumerate(map(lambda x: tuple(x), p.areaRng)) if a in setA]
i_list = [n for n, i in enumerate(p.imgIds) if i in setI]
I0 = len(_pe.imgIds)
A0 = len(_pe.areaRng)
# retrieve E at each category, area range, and max number of detections
for k, k0 in enumerate(k_list):
Nk = k0*A0*I0
for a, a0 in enumerate(a_list):
Na = a0*I0
for m, maxDet in enumerate(m_list):
E = [self.evalImgs[Nk + Na + i] for i in i_list]
E = [e for e in E if not e is None]
if len(E) == 0:
continue
dtScores = np.concatenate([e['dtScores'][0:maxDet] for e in E])

# different sorting method generates slightly different results.
# mergesort is used to be consistent as Matlab implementation.
inds = np.argsort(-dtScores, kind='mergesort')
dtScoresSorted = dtScores[inds]

dtm = np.concatenate([e['dtMatches'][:,0:maxDet] for e in E], axis=1)[:,inds]
dtIg = np.concatenate([e['dtIgnore'][:,0:maxDet] for e in E], axis=1)[:,inds]
gtIg = np.concatenate([e['gtIgnore'] for e in E])
npig = np.count_nonzero(gtIg==0 )
if npig == 0:
continue
tps = np.logical_and( dtm, np.logical_not(dtIg) )
fps = np.logical_and(np.logical_not(dtm), np.logical_not(dtIg) )

tp_sum = np.cumsum(tps, axis=1).astype(dtype=np.float)
fp_sum = np.cumsum(fps, axis=1).astype(dtype=np.float)
for t, (tp, fp) in enumerate(zip(tp_sum, fp_sum)):
tp = np.array(tp)
fp = np.array(fp)
nd = len(tp)
rc = tp / npig
pr = tp / (fp+tp+np.spacing(1))
q = np.zeros((R,))
ss = np.zeros((R,))

if nd:
recall[t,k,a,m] = rc[-1]
else:
recall[t,k,a,m] = 0

# numpy is slow without cython optimization for accessing elements
# use python array gets significant speed improvement
pr = pr.tolist(); q = q.tolist()

for i in range(nd-1, 0, -1):
if pr[i] > pr[i-1]:
pr[i-1] = pr[i]

inds = np.searchsorted(rc, p.recThrs, side='left')
try:
for ri, pi in enumerate(inds):
q[ri] = pr[pi]
ss[ri] = dtScoresSorted[pi]
except:
pass
precision[t,:,k,a,m] = np.array(q)
scores[t,:,k,a,m] = np.array(ss)
self.eval = {
'params': p,
'counts': [T, R, K, A, M],
'date': datetime.datetime.now().strftime('%Y-%m-%d %H:%M:%S'),
'precision': precision,
'recall': recall,
'scores': scores,
}
toc = time.time()
print('DONE (t={:0.2f}s).'.format( toc-tic))

def summarize(self):
'''
Compute and display summary metrics for evaluation results.
Note this functin can *only* be applied on the default parameter setting
'''
def _summarize( ap=1, iouThr=None, areaRng='all', maxDets=100 ):
p = self.params
iStr = ' {:<18} {} @[ IoU={:<9} | area={:>6s} | maxDets={:>3d} ] = {:0.3f}'
titleStr = 'Average Precision' if ap == 1 else 'Average Recall'
typeStr = '(AP)' if ap==1 else '(AR)'
iouStr = '{:0.2f}:{:0.2f}'.format(p.iouThrs[0], p.iouThrs[-1]) \
if iouThr is None else '{:0.2f}'.format(iouThr)

aind = [i for i, aRng in enumerate(p.areaRngLbl) if aRng == areaRng]
mind = [i for i, mDet in enumerate(p.maxDets) if mDet == maxDets]
if ap == 1:
# dimension of precision: [TxRxKxAxM]
s = self.eval['precision']
# IoU
if iouThr is not None:
t = np.where(iouThr == p.iouThrs)[0]
s = s[t]
s = s[:,:,:,aind,mind]
else:
# dimension of recall: [TxKxAxM]
s = self.eval['recall']
if iouThr is not None:
t = np.where(iouThr == p.iouThrs)[0]
s = s[t]
s = s[:,:,aind,mind]
if len(s[s>-1])==0:
mean_s = -1
else:
mean_s = np.mean(s[s>-1])
print(iStr.format(titleStr, typeStr, iouStr, areaRng, maxDets, mean_s))
return mean_s
def _summarizeDets():
stats = np.zeros((12,))
stats[0] = _summarize(1)
stats[1] = _summarize(1, iouThr=.5, maxDets=self.params.maxDets[2])
stats[2] = _summarize(1, iouThr=.75, maxDets=self.params.maxDets[2])
stats[3] = _summarize(1, areaRng='small', maxDets=self.params.maxDets[2])
stats[4] = _summarize(1, areaRng='medium', maxDets=self.params.maxDets[2])
stats[5] = _summarize(1, areaRng='large', maxDets=self.params.maxDets[2])
stats[6] = _summarize(0, maxDets=self.params.maxDets[0])
stats[7] = _summarize(0, maxDets=self.params.maxDets[1])
stats[8] = _summarize(0, maxDets=self.params.maxDets[2])
stats[9] = _summarize(0, areaRng='small', maxDets=self.params.maxDets[2])
stats[10] = _summarize(0, areaRng='medium', maxDets=self.params.maxDets[2])
stats[11] = _summarize(0, areaRng='large', maxDets=self.params.maxDets[2])
return stats
def _summarizeKps():
stats = np.zeros((10,))
stats[0] = _summarize(1, maxDets=20)
stats[1] = _summarize(1, maxDets=20, iouThr=.5)
stats[2] = _summarize(1, maxDets=20, iouThr=.75)
stats[3] = _summarize(1, maxDets=20, areaRng='medium')
stats[4] = _summarize(1, maxDets=20, areaRng='large')
stats[5] = _summarize(0, maxDets=20)
stats[6] = _summarize(0, maxDets=20, iouThr=.5)
stats[7] = _summarize(0, maxDets=20, iouThr=.75)
stats[8] = _summarize(0, maxDets=20, areaRng='medium')
stats[9] = _summarize(0, maxDets=20, areaRng='large')
return stats
if not self.eval:
raise Exception('Please run accumulate() first')
iouType = self.params.iouType
if iouType == 'segm' or iouType == 'bbox':
summarize = _summarizeDets
elif iouType == 'keypoints':
summarize = _summarizeKps
self.stats = summarize()

def __str__(self):
self.summarize()

class Params:
'''
Params for coco evaluation api
'''
def setDetParams(self):
self.imgIds = []
self.catIds = []
# np.arange causes trouble. the data point on arange is slightly larger than the true value
self.iouThrs = np.linspace(.5, 0.95, np.round((0.95 - .5) / .05) + 1, endpoint=True)
self.recThrs = np.linspace(.0, 1.00, np.round((1.00 - .0) / .01) + 1, endpoint=True)
self.maxDets = [1, 10, 100]
self.areaRng = [[0 ** 2, 1e5 ** 2], [0 ** 2, 32 ** 2], [32 ** 2, 96 ** 2], [96 ** 2, 1e5 ** 2]]
self.areaRngLbl = ['all', 'small', 'medium', 'large']
self.useCats = 1

def setKpParams(self):
self.imgIds = []
self.catIds = []
# np.arange causes trouble. the data point on arange is slightly larger than the true value
self.iouThrs = np.linspace(.5, 0.95, np.round((0.95 - .5) / .05) + 1, endpoint=True)
self.recThrs = np.linspace(.0, 1.00, np.round((1.00 - .0) / .01) + 1, endpoint=True)
self.maxDets = [20]
self.areaRng = [[0 ** 2, 1e5 ** 2], [32 ** 2, 96 ** 2], [96 ** 2, 1e5 ** 2]]
self.areaRngLbl = ['all', 'medium', 'large']
self.useCats = 1

def __init__(self, iouType='segm'):
if iouType == 'segm' or iouType == 'bbox':
self.setDetParams()
elif iouType == 'keypoints':
self.setKpParams()
else:
raise Exception('iouType not supported')
self.iouType = iouType
# useSegm is deprecated
self.useSegm = None

3. 评测指标示例 - pycocoEvalDemo

PythonAPI/pycocoEvalDemo.ipynb

1
2
3
4
5
6
7
8
9
10
11
12
13
14
15
16
17
18
19
20
21
22
23
24
25
26
27
28
29
30
31
32
33
34
35
import matplotlib.pyplot as plt
from pycocotools.coco import COCO
from pycocotools.cocoeval import COCOeval
import numpy as np
import skimage.io as io
import pylab
pylab.rcParams['figure.figsize'] = (10.0, 8.0)


annType = ['segm','bbox','keypoints']
annType = annType[1] # specify type here - bbox 类型
prefix = 'person_keypoints' if annType=='keypoints' else 'instances'
print 'Running demo for *%s* results.'%(annType)

#initialize COCO ground truth api
dataDir='../'
dataType='val2014'
annFile = '%s/annotations/%s_%s.json'%(dataDir,prefix,dataType)
cocoGt=COCO(annFile)

#initialize COCO detections api
resFile='%s/results/%s_%s_fake%s100_results.json'
resFile = resFile%(dataDir, prefix, dataType, annType)
cocoDt=cocoGt.loadRes(resFile)

imgIds=sorted(cocoGt.getImgIds())
imgIds=imgIds[0:100]
imgId = imgIds[np.random.randint(100)]

# running evaluation
cocoEval = COCOeval(cocoGt,cocoDt,annType)
cocoEval.params.imgIds = imgIds
cocoEval.evaluate()
cocoEval.accumulate()
cocoEval.summarize()

输出结果如:

1
2
3
4
5
6
7
8
9
10
11
12
13
14
15
16
Running per image evaluation...      
DONE (t=0.46s).
Accumulating evaluation results...
DONE (t=0.38s).
Average Precision (AP) @[ IoU=0.50:0.95 | area= all | maxDets=100 ] = 0.505
Average Precision (AP) @[ IoU=0.50 | area= all | maxDets=100 ] = 0.697
Average Precision (AP) @[ IoU=0.75 | area= all | maxDets=100 ] = 0.573
Average Precision (AP) @[ IoU=0.50:0.95 | area= small | maxDets=100 ] = 0.586
Average Precision (AP) @[ IoU=0.50:0.95 | area=medium | maxDets=100 ] = 0.519
Average Precision (AP) @[ IoU=0.50:0.95 | area= large | maxDets=100 ] = 0.501
Average Recall (AR) @[ IoU=0.50:0.95 | area= all | maxDets= 1 ] = 0.387
Average Recall (AR) @[ IoU=0.50:0.95 | area= all | maxDets= 10 ] = 0.594
Average Recall (AR) @[ IoU=0.50:0.95 | area= all | maxDets=100 ] = 0.595
Average Recall (AR) @[ IoU=0.50:0.95 | area= small | maxDets=100 ] = 0.640
Average Recall (AR) @[ IoU=0.50:0.95 | area=medium | maxDets=100 ] = 0.566
Average Recall (AR) @[ IoU=0.50:0.95 | area= large | maxDets=100 ] = 0.564

4. COCO 类

PythonAPI/pycocotools/coco.py

COCO 格式数据集的类:

1
2
3
4
5
6
7
8
9
10
11
12
13
14
15
16
17
18
19
20
21
22
23
24
25
26
27
28
29
30
31
32
33
34
35
36
37
38
39
40
41
42
43
44
45
46
47
48
49
50
51
52
53
54
55
56
57
58
59
60
61
62
63
64
65
66
67
68
69
70
71
72
73
74
75
76
77
78
79
80
81
82
83
84
85
86
87
88
89
90
91
92
93
94
95
96
97
98
99
100
101
102
103
104
105
106
107
108
109
110
111
112
113
114
115
116
117
118
119
120
121
122
123
124
125
126
127
128
129
130
131
132
133
134
135
136
137
138
139
140
141
142
143
144
145
146
147
148
149
150
151
152
153
154
155
156
157
158
159
160
161
162
163
164
165
166
167
168
169
170
171
172
173
174
175
176
177
178
179
180
181
182
183
184
185
186
187
188
189
190
191
192
193
194
195
196
197
198
199
200
201
202
203
204
205
206
207
208
209
210
211
212
213
214
215
216
217
218
219
220
221
222
223
224
225
226
227
228
229
230
231
232
233
234
235
236
237
238
239
240
241
242
243
244
245
246
247
248
249
250
251
252
253
254
255
256
257
258
259
260
261
262
263
264
265
266
267
268
269
270
271
272
273
274
275
276
277
278
279
280
281
282
283
284
285
286
287
288
289
290
291
292
293
294
295
296
297
298
299
300
301
302
303
304
305
306
307
308
309
310
311
312
313
314
315
316
317
318
319
320
321
322
323
324
325
326
327
328
329
330
331
332
333
334
335
336
337
338
339
340
341
342
343
344
345
346
347
348
349
350
351
352
353
354
355
356
357
358
359
360
361
362
363
364
365
366
367
368
369
370
371
372
373
374
375
376
377
378
379
380
381
382
383
384
385
386
387
388
389
390
391
392
393
394
395
396
397
398
399
400
401
402
403
404
405
406
407
408
409
410
411
412
__author__ = 'tylin'
__version__ = '2.0'

# API用于将 COCO 标注数据集 annotations 直接加载到 Python 字典.
# 还提供了其它辅助函数.
# 该 API 同时支持 *instance* 和 *caption* 的标注数据.
# 但,并未定义 *caption* 的全部函数(如,categories 暂未定义).

# API 中包含的函数如下:
# 其中,"ann"=annotation, "cat"=category, and "img"=image.
# COCO - COCO api class that loads COCO annotation file and prepare data structures.
# decodeMask - Decode binary mask M encoded via run-length encoding.
# encodeMask - Encode binary mask M using run-length encoding.
# getAnnIds - Get ann ids that satisfy given filter conditions.
# getCatIds - Get cat ids that satisfy given filter conditions.
# getImgIds - Get img ids that satisfy given filter conditions.
# loadAnns - Load anns with the specified ids.
# loadCats - Load cats with the specified ids.
# loadImgs - Load imgs with the specified ids.
# annToMask - Convert segmentation in an annotation to binary mask.
# showAnns - Display the specified annotations.
# loadRes - Load algorithm results and create API for accessing them.
# download - Download COCO images from mscoco.org server.


import json
import time
import matplotlib.pyplot as plt
from matplotlib.collections import PatchCollection
from matplotlib.patches import Polygon
import numpy as np
import copy
import itertools
from . import mask as maskUtils
import os
from collections import defaultdict
import sys
PYTHON_VERSION = sys.version_info[0]
if PYTHON_VERSION == 2:
from urllib import urlretrieve
elif PYTHON_VERSION == 3:
from urllib.request import urlretrieve


def _isArrayLike(obj):
return hasattr(obj, '__iter__') and hasattr(obj, '__len__')


class COCO:
def __init__(self, annotation_file=None):
"""
Constructor of Microsoft COCO helper class for reading and visualizing annotations.
:param annotation_file (str): location of annotation file
:param image_folder (str): location to the folder that hosts images.
:return:
"""
# load dataset
self.dataset,self.anns,self.cats,self.imgs = dict(),dict(),dict(),dict()
self.imgToAnns, self.catToImgs = defaultdict(list), defaultdict(list)
if not annotation_file == None:
print('loading annotations into memory...')
tic = time.time()
dataset = json.load(open(annotation_file, 'r'))
assert type(dataset)==dict, 'annotation file format {} not supported'.format(type(dataset))
print('Done (t={:0.2f}s)'.format(time.time()- tic))
self.dataset = dataset
self.createIndex()

def createIndex(self):
# create index
print('creating index...')
anns, cats, imgs = {}, {}, {}
imgToAnns,catToImgs = defaultdict(list),defaultdict(list)
if 'annotations' in self.dataset:
for ann in self.dataset['annotations']:
imgToAnns[ann['image_id']].append(ann)
anns[ann['id']] = ann

if 'images' in self.dataset:
for img in self.dataset['images']:
imgs[img['id']] = img

if 'categories' in self.dataset:
for cat in self.dataset['categories']:
cats[cat['id']] = cat

if 'annotations' in self.dataset and 'categories' in self.dataset:
for ann in self.dataset['annotations']:
catToImgs[ann['category_id']].append(ann['image_id'])

print('index created!')

# create class members
self.anns = anns
self.imgToAnns = imgToAnns
self.catToImgs = catToImgs
self.imgs = imgs
self.cats = cats

def info(self):
"""
Print information about the annotation file.
:return:
"""
for key, value in self.dataset['info'].items():
print('{}: {}'.format(key, value))

def getAnnIds(self, imgIds=[], catIds=[], areaRng=[], iscrowd=None):
"""
Get ann ids that satisfy given filter conditions. default skips that filter
:param imgIds (int array) : get anns for given imgs
catIds (int array) : get anns for given cats
areaRng (float array) : get anns for given area range (e.g. [0 inf])
iscrowd (boolean) : get anns for given crowd label (False or True)
:return: ids (int array) : integer array of ann ids
"""
imgIds = imgIds if _isArrayLike(imgIds) else [imgIds]
catIds = catIds if _isArrayLike(catIds) else [catIds]

if len(imgIds) == len(catIds) == len(areaRng) == 0:
anns = self.dataset['annotations']
else:
if not len(imgIds) == 0:
lists = [self.imgToAnns[imgId] for imgId in imgIds if imgId in self.imgToAnns]
anns = list(itertools.chain.from_iterable(lists))
else:
anns = self.dataset['annotations']
anns = anns if len(catIds) == 0 else [ann for ann in anns if ann['category_id'] in catIds]
anns = anns if len(areaRng) == 0 else [ann for ann in anns if ann['area'] > areaRng[0] and ann['area'] < areaRng[1]]
if not iscrowd == None:
ids = [ann['id'] for ann in anns if ann['iscrowd'] == iscrowd]
else:
ids = [ann['id'] for ann in anns]
return ids

def getCatIds(self, catNms=[], supNms=[], catIds=[]):
"""
filtering parameters. default skips that filter.
:param catNms (str array) : get cats for given cat names
:param supNms (str array) : get cats for given supercategory names
:param catIds (int array) : get cats for given cat ids
:return: ids (int array) : integer array of cat ids
"""
catNms = catNms if _isArrayLike(catNms) else [catNms]
supNms = supNms if _isArrayLike(supNms) else [supNms]
catIds = catIds if _isArrayLike(catIds) else [catIds]

if len(catNms) == len(supNms) == len(catIds) == 0:
cats = self.dataset['categories']
else:
cats = self.dataset['categories']
cats = cats if len(catNms) == 0 else [cat for cat in cats if cat['name'] in catNms]
cats = cats if len(supNms) == 0 else [cat for cat in cats if cat['supercategory'] in supNms]
cats = cats if len(catIds) == 0 else [cat for cat in cats if cat['id'] in catIds]
ids = [cat['id'] for cat in cats]
return ids

def getImgIds(self, imgIds=[], catIds=[]):
'''
Get img ids that satisfy given filter conditions.
:param imgIds (int array) : get imgs for given ids
:param catIds (int array) : get imgs with all given cats
:return: ids (int array) : integer array of img ids
'''
imgIds = imgIds if _isArrayLike(imgIds) else [imgIds]
catIds = catIds if _isArrayLike(catIds) else [catIds]

if len(imgIds) == len(catIds) == 0:
ids = self.imgs.keys()
else:
ids = set(imgIds)
for i, catId in enumerate(catIds):
if i == 0 and len(ids) == 0:
ids = set(self.catToImgs[catId])
else:
ids &= set(self.catToImgs[catId])
return list(ids)

def loadAnns(self, ids=[]):
"""
Load anns with the specified ids.
:param ids (int array) : integer ids specifying anns
:return: anns (object array) : loaded ann objects
"""
if _isArrayLike(ids):
return [self.anns[id] for id in ids]
elif type(ids) == int:
return [self.anns[ids]]

def loadCats(self, ids=[]):
"""
Load cats with the specified ids.
:param ids (int array) : integer ids specifying cats
:return: cats (object array) : loaded cat objects
"""
if _isArrayLike(ids):
return [self.cats[id] for id in ids]
elif type(ids) == int:
return [self.cats[ids]]

def loadImgs(self, ids=[]):
"""
Load anns with the specified ids.
:param ids (int array) : integer ids specifying img
:return: imgs (object array) : loaded img objects
"""
if _isArrayLike(ids):
return [self.imgs[id] for id in ids]
elif type(ids) == int:
return [self.imgs[ids]]

def showAnns(self, anns):
"""
Display the specified annotations.
:param anns (array of object): annotations to display
:return: None
"""
if len(anns) == 0:
return 0
if 'segmentation' in anns[0] or 'keypoints' in anns[0]:
datasetType = 'instances'
elif 'caption' in anns[0]:
datasetType = 'captions'
else:
raise Exception('datasetType not supported')
if datasetType == 'instances':
ax = plt.gca()
ax.set_autoscale_on(False)
polygons = []
color = []
for ann in anns:
c = (np.random.random((1, 3))*0.6+0.4).tolist()[0]
if 'segmentation' in ann:
if type(ann['segmentation']) == list:
# polygon
for seg in ann['segmentation']:
poly = np.array(seg).reshape((int(len(seg)/2), 2))
polygons.append(Polygon(poly))
color.append(c)
else:
# mask
t = self.imgs[ann['image_id']]
if type(ann['segmentation']['counts']) == list:
rle = maskUtils.frPyObjects([ann['segmentation']], t['height'], t['width'])
else:
rle = [ann['segmentation']]
m = maskUtils.decode(rle)
img = np.ones( (m.shape[0], m.shape[1], 3) )
if ann['iscrowd'] == 1:
color_mask = np.array([2.0,166.0,101.0])/255
if ann['iscrowd'] == 0:
color_mask = np.random.random((1, 3)).tolist()[0]
for i in range(3):
img[:,:,i] = color_mask[i]
ax.imshow(np.dstack( (img, m*0.5) ))
if 'keypoints' in ann and type(ann['keypoints']) == list:
# turn skeleton into zero-based index
sks = np.array(self.loadCats(ann['category_id'])[0]['skeleton'])-1
kp = np.array(ann['keypoints'])
x = kp[0::3]
y = kp[1::3]
v = kp[2::3]
for sk in sks:
if np.all(v[sk]>0):
plt.plot(x[sk],y[sk], linewidth=3, color=c)
plt.plot(x[v>0], y[v>0],'o',markersize=8, markerfacecolor=c, markeredgecolor='k',markeredgewidth=2)
plt.plot(x[v>1], y[v>1],'o',markersize=8, markerfacecolor=c, markeredgecolor=c, markeredgewidth=2)
p = PatchCollection(polygons, facecolor=color, linewidths=0, alpha=0.4)
ax.add_collection(p)
p = PatchCollection(polygons, facecolor='none', edgecolors=color, linewidths=2)
ax.add_collection(p)
elif datasetType == 'captions':
for ann in anns:
print(ann['caption'])

def loadRes(self, resFile):
"""
Load result file and return a result api object.
:param resFile (str) : file name of result file
:return: res (obj) : result api object
"""
res = COCO()
res.dataset['images'] = [img for img in self.dataset['images']]

print('Loading and preparing results...')
tic = time.time()
if type(resFile) == str or type(resFile) == unicode:
anns = json.load(open(resFile))
elif type(resFile) == np.ndarray:
anns = self.loadNumpyAnnotations(resFile)
else:
anns = resFile
assert type(anns) == list, 'results in not an array of objects'
annsImgIds = [ann['image_id'] for ann in anns]
assert set(annsImgIds) == (set(annsImgIds) & set(self.getImgIds())), \
'Results do not correspond to current coco set'
if 'caption' in anns[0]:
imgIds = set([img['id'] for img in res.dataset['images']]) & set([ann['image_id'] for ann in anns])
res.dataset['images'] = [img for img in res.dataset['images'] if img['id'] in imgIds]
for id, ann in enumerate(anns):
ann['id'] = id+1
elif 'bbox' in anns[0] and not anns[0]['bbox'] == []:
res.dataset['categories'] = copy.deepcopy(self.dataset['categories'])
for id, ann in enumerate(anns):
bb = ann['bbox']
x1, x2, y1, y2 = [bb[0], bb[0]+bb[2], bb[1], bb[1]+bb[3]]
if not 'segmentation' in ann:
ann['segmentation'] = [[x1, y1, x1, y2, x2, y2, x2, y1]]
ann['area'] = bb[2]*bb[3]
ann['id'] = id+1
ann['iscrowd'] = 0
elif 'segmentation' in anns[0]:
res.dataset['categories'] = copy.deepcopy(self.dataset['categories'])
for id, ann in enumerate(anns):
# now only support compressed RLE format as segmentation results
ann['area'] = maskUtils.area(ann['segmentation'])
if not 'bbox' in ann:
ann['bbox'] = maskUtils.toBbox(ann['segmentation'])
ann['id'] = id+1
ann['iscrowd'] = 0
elif 'keypoints' in anns[0]:
res.dataset['categories'] = copy.deepcopy(self.dataset['categories'])
for id, ann in enumerate(anns):
s = ann['keypoints']
x = s[0::3]
y = s[1::3]
x0,x1,y0,y1 = np.min(x), np.max(x), np.min(y), np.max(y)
ann['area'] = (x1-x0)*(y1-y0)
ann['id'] = id + 1
ann['bbox'] = [x0,y0,x1-x0,y1-y0]
print('DONE (t={:0.2f}s)'.format(time.time()- tic))

res.dataset['annotations'] = anns
res.createIndex()
return res

def download(self, tarDir = None, imgIds = [] ):
'''
Download COCO images from mscoco.org server.
:param tarDir (str): COCO results directory name
imgIds (list): images to be downloaded
:return:
'''
if tarDir is None:
print('Please specify target directory')
return -1
if len(imgIds) == 0:
imgs = self.imgs.values()
else:
imgs = self.loadImgs(imgIds)
N = len(imgs)
if not os.path.exists(tarDir):
os.makedirs(tarDir)
for i, img in enumerate(imgs):
tic = time.time()
fname = os.path.join(tarDir, img['file_name'])
if not os.path.exists(fname):
urlretrieve(img['coco_url'], fname)
print('downloaded {}/{} images (t={:0.1f}s)'.format(i, N, time.time()- tic))

def loadNumpyAnnotations(self, data):
"""
Convert result data from a numpy array [Nx7] where each row contains {imageID,x1,y1,w,h,score,class}
:param data (numpy.ndarray)
:return: annotations (python nested list)
"""
print('Converting ndarray to lists...')
assert(type(data) == np.ndarray)
print(data.shape)
assert(data.shape[1] == 7)
N = data.shape[0]
ann = []
for i in range(N):
if i % 1000000 == 0:
print('{}/{}'.format(i,N))
ann += [{
'image_id' : int(data[i, 0]),
'bbox' : [ data[i, 1], data[i, 2], data[i, 3], data[i, 4] ],
'score' : data[i, 5],
'category_id': int(data[i, 6]),
}]
return ann

def annToRLE(self, ann):
"""
Convert annotation which can be polygons, uncompressed RLE to RLE.
:return: binary mask (numpy 2D array)
"""
t = self.imgs[ann['image_id']]
h, w = t['height'], t['width']
segm = ann['segmentation']
if type(segm) == list:
# polygon -- a single object might consist of multiple parts
# we merge all parts into one mask rle code
rles = maskUtils.frPyObjects(segm, h, w)
rle = maskUtils.merge(rles)
elif type(segm['counts']) == list:
# uncompressed RLE
rle = maskUtils.frPyObjects(segm, h, w)
else:
# rle
rle = ann['segmentation']
return rle

def annToMask(self, ann):
"""
Convert annotation which can be polygons, uncompressed RLE, or RLE to binary mask.
:return: binary mask (numpy 2D array)
"""
rle = self.annToRLE(ann)
m = maskUtils.decode(rle)
return m